If you’ve got a problem drainage area in your backyard, why not consider building a dry creek bed? Also known as a dry stream bed, this is an easy DIY landscaping idea that consists of a gully or trench, usually lined with stones and edged with plants to mimic a natural riparian area.
Steps to Build a Dry Creek Bed
- Make a plan for your DIY dry creek. Expert landscaper, professional angler, and host of this video Brian Latimer says, he likes to think about what a landscape would have looked like before a home was built there. When he makes changes to his yard, he tries to create a landscape that’s as natural looking as possible. Of course, he draws a lot of inspiration from nature—and the places where he likes to fish! This river bed project is not just for aesthetics, Latimer also going for function as the creek bed will help with drainage by redirecting the flow of water where the mulch keeps washing away and the grass isn’t growing well.
- Create a blank slate. To do so, dig up all of the plants in your project area. If you plan to reorganize, reuse and replant them, place the plants in containers for temporary storage while you work.
- Map the dry steam path. Next, Latimer spray paints the exact route where he wants the water to flow. Then, he starts to dig along where he painted. Digging, says Latimer, is always the hard part.
- Lay down fabric. Latimer uses geo fabric. This step creates his bed’s base, and ensures his rocks will be as sediment and weed free as possible. Although eventual weed growth will lead to rebuilding creek beds, Latimer says laying down geo fabric, it will prolong the need to do so for several years.
- Build the creek bed. This is the fun part. Latimer plans to bring in some rock and flowers, as well as some of the plants he dug up. The goal is to convert a previously problematic area into a functional and beautiful landscape.
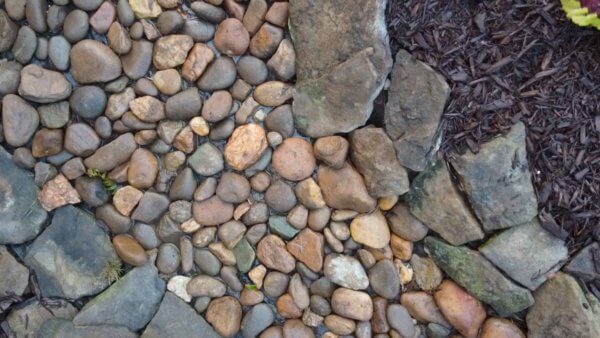
- Start from the bottom and build out. On the bottom, Latimer uses a smaller round rock to form the base of the drainage basin. He then uses a larger Tennessee stack stone to build up the sides. Latimer places the rocks in the basin carefully, as opposed to just dumping them in haphazardly. Although more work, he firmly believes it’s worth it. Using two different types of rock, he says, also gives the creek bed a more natural look.
- Dry creek bed landscaping. Now that the heavy lifting’s done, it’s time to fill in with his stream bed with landscape plants. Because this area is going to be wet most of the time, Latimer emphasizes the need to use native plant materials that are accustomed to a wet environment. Latimer first lays out plants—a mix of flowering plants, foliage and ferns—where he thinks he wants them before actually planting them. It’s okay, he says, to space them closely together—and use groupings—because you want your dry stream bed to look natural. In nature, says Latimer, it’s important to remember that plants are always in groupings, not growing individually.
- Finishing touches. Once satisfied with his plant layout and his DIY creek bed landscaping, Latimer then lays mulch down to protect the small, young plants he’ll be putting in the ground. Doing this first helps to minimize potential plant damage, and makes final touch up around them a breeze.