Exmark Z Turf Equipment Backyard Life
  • Skip to primary navigation
  • Skip to main content
  • Skip to primary sidebar

Exmark's Backyard Life

Living Happens Outdoors

  • Mowing
  • Outdoor Living
  • Lawn + Garden
  • Ambassadors
  • Originals
  • About Exmark
  • Subscribe to Backyard Life
Search

Common Lawn Weeds & What To Do About Them

May 15, 2025 by Exmark

Every backyard warrior knows how quickly a weed infestation can turn a dream yard into a nightmare. So how do you get ahead? Exmark pro ambassador, weed expert, and owner of Alabama Lawn Pros, Jason Creel, is on the weed-fighting case. Follow along in this episode of Done-In-A-Weekend Projects as Creel joins host Doug Scott to help homeowners better understand the common lawn weeds in their yard. So you can develop a prevention strategy that keeps them at bay and enjoy a weed-free backyard life.

Weed Control Basics

Before Doug and Jason dive into the wide world of weed control, there are a few pointers to consider first. Namely, as Jason says, weed control isn’t a one-and-done process. Across the country, or even across the road, every yard has its own mixed bag of weeds. So work and research are needed to ensure that you have the right product at the right amount—and at the right time.

And before you can even consider herbicides, you have to win the first half of the battle: identifying the weeds in your lawn.

Identifying Common Lawn Weeds

As you’ve probably guessed, not all weeds grow the same—which can make formulating your weed control approach slightly overwhelming. Thankfully, they fall into three categories, grassy weeds, broadleaf weeds, and sedges, making control slightly easier.

Crabgrass growing in a lawn
Crabgrass by pollyalida on Flickr

Grassy weeds, such as crabgrass and goosegrass, can be difficult to identify, as they boast long, flat, and pointed blades that look very much like those in your lawn. Unlike turfgrass, these weeds grow in clumps or bunches, have visible seedheads, hollow stems, and are slightly off-color from the surrounding lawn. They also grow both taller and more quickly than your lawn, giving you a slight advantage in the identification game.  

Dandelions growing in a lawn
Lawn covered in dandelion flowers by Mike Mozart on Flickr

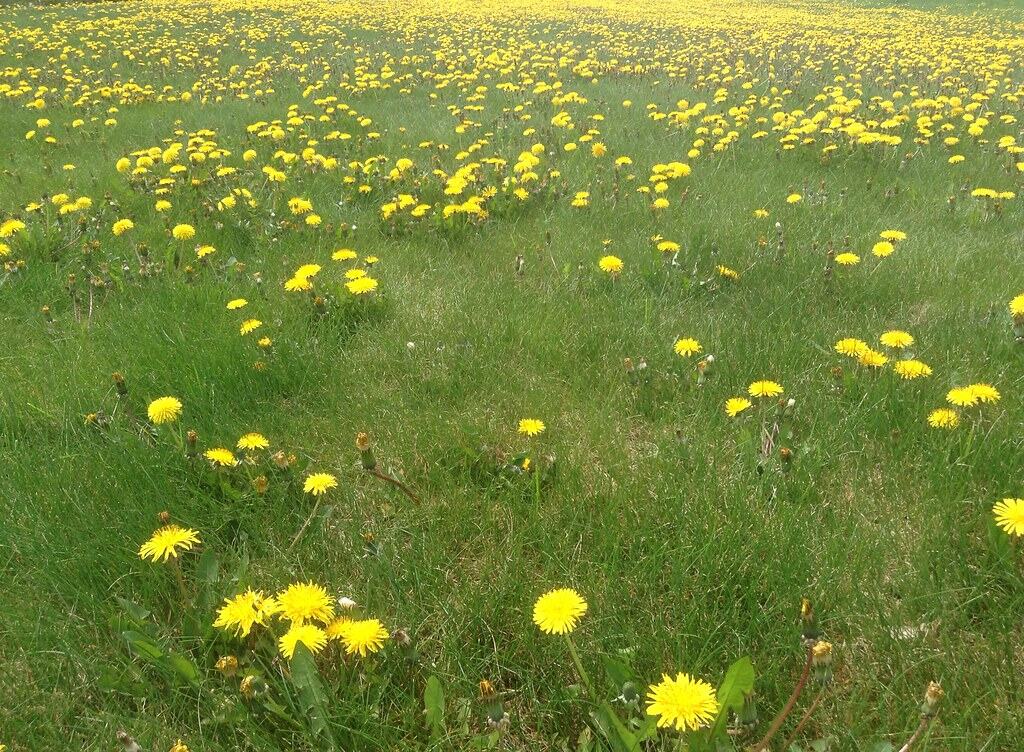
Broadleaf weeds are easier to identify than their grassy counterparts, owing to their wide, flat (and broad) leaves. Their leaves are typically veiny as well, possessing one large vein that bisects the center of the leaf with countless smaller ones branching off it. These weeds also tend to sprout bright flowers and seedheads (dandelions and clover being two of the most common types) and grow a deep taproot that’s tough to root out.

Nutsedge growing in lawn
Nutsedge by Jkadavoor (Jee) on Flickr

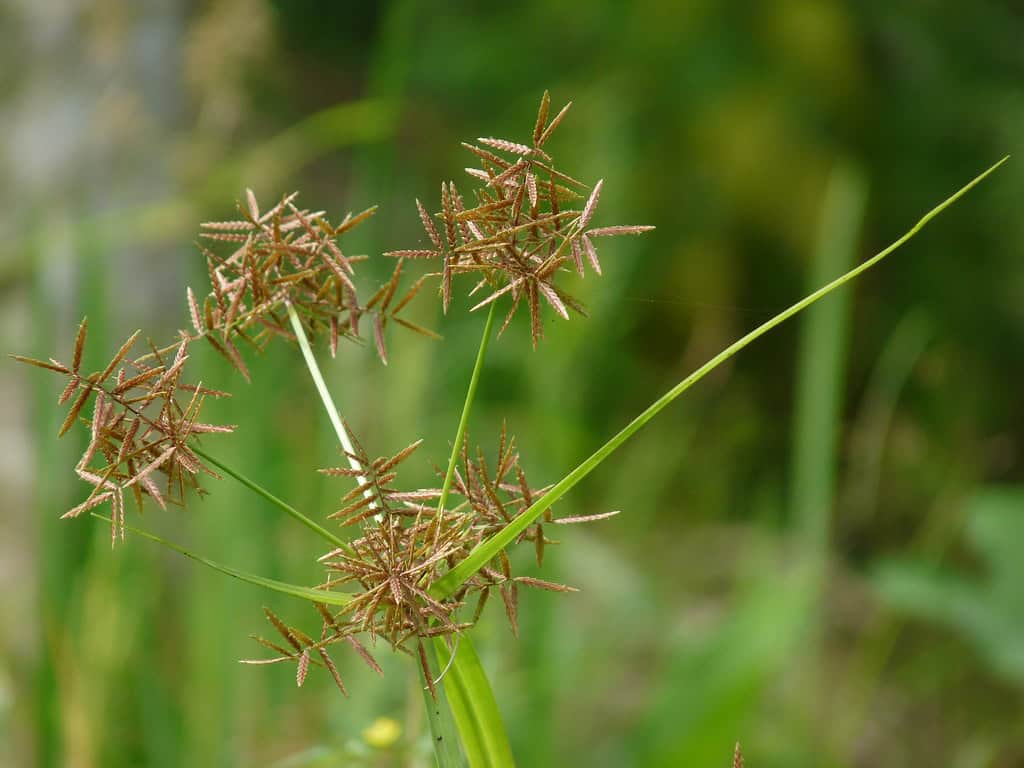
Finally, sedges—like nutsedge—look a whole lot like turfgrasses and grassy weeds. That’s where a deeper look comes into play. Unlike grassy weeds, which have hollow stems and leaf nodes, sedges have solid, triangular stems.

The Life Cycle of Weeds

As Jason says, before you can start “spraying and praying” herbicide, you also have to first understand the life cycles of weeds found in your yard.

Some weeds, like common ragweed and spurge, are annuals. Meaning, they germinate, grow, and die all within a single season. Others, like oxalis and nutsedge, are perennials, returning year after year, requiring constant maintenance and vigilance to hold them at bay. And that’s not to mention biennial weeds, such as wild carrot and musk thistle, which have a two-year life cycle. They experience vegetative growth in the first, followed by flowering and seed production in the second, before finally dying.

Like the grass in your lawn, these three weed life cycles are further characterized by their seasonal growth cycles. Warm-season weeds germinate in the spring, thrive in the summer, and die off in the fall. Whereas cool-season weeds germinate in the fall, mature in the spring, and die in the scorching summer sun.

Herbicide Application and Timing

The various weed types and life cycles mean that weed control is way more than a one-and-done, or even twice a year, effort. It requires year-round strategy and application to effectively nip them in the bud.

It all starts with a pre-emergent herbicide application in both the spring and fall as the first line of defense. However, timing is key, as soil temperature dictates when seeds germinate, making it essential to monitor your local weather. Some varieties, like crabgrass, germinate when soil temperature hit 55º F. So, depending on your climate, an early spring (or even winter) application is a must.

While settling into a routine is nice, you can’t always stick to the same schedule you’ve followed in the past. The weather shifts every year, giving us cooler springs or warmer falls, so you need to adjust your application timing for the best results.

Even the best plan doesn’t keep 100% of weeds from slipping through—which is where post-emergents come in. Simply put, apply post-emergents whenever weeds rear their invasive heads. For even better results, Jason states you can mix pre- and post-emergents together to control existing weeds while fighting back against future ones.

As always, make sure to follow the instructions on your product label. Different products have different application and temperature restrictions, so it’s best to know everything before you get spraying.

Herbicide Selection

Unfortunately, there’s no one-product-prevents-all when it comes to weed control. Some weeds develop resistance to certain products through generational exposure, and others require different types of treatments. So rotating herbicides with different active ingredients is your best bet to ensuring long-term success.

Additional Weed Control Considerations

While herbicide use does a lot of the heavy lifting when it comes to weed control, a healthy, thick lawn goes far. And part of that lawn health starts with mowing—a healthy lawn fights weeds more easily, so sharp blades and varied mowing patterns are a must.

Mowing frequency matters too: lawns cut weekly tend to have fewer weeds than those cut every other. If you let your grass grow too tall and cut off a large chunk to save time, you risk stressing and weakening your lawn. So, make sure to mow at the ideal height according to your grass type and stick to the “Golden Rule” if hopping on the mower after a long break.

At the end of the day, weed control boils down to three main points: identification, application, and consistency. If you follow these guidelines, you’ll be well on your way to getting ahead of the spread or fighting back against a potential infestation. Oh, and enjoying a green and pristine backyard life, of course!

More Like This

  • How to Prevent Weeds From Growing This Spring
  • How to Control Weeds in Your Lawn
  • How to Prevent Weeds in Your Garden

Filed Under: Lawn + Garden, Mowing Tagged With: Lawn + Grass Care, plan, spring, summer

How to Determine the Correct Lawn Mower Height Settings

April 16, 2025 by Exmark

One of the most highly debated lawn care topics is also one of the most important: determining the correct lawn mower height settings for your yard. Unfortunately, there are almost as many opinions and perspectives on this topic as there are grass blades in your lawn. So where do you begin? This episode of Done-In-A-Weekend Projects has you covered. Tune in as host Doug Scott explains how high—or low—you should mow this season.

Cool-season vs. Warm-season: What’s the Difference?

Before you break out your Exmark for your mow, a refresher on what grass type you have in your lawn goes far. In short, grass is broken down into two main categories: cool- and warm-season. And where you live determines what you have.

Cool-season grasses, such as Kentucky bluegrass, tall and fine fescues, and perennial ryegrass, are typically found in northern, cooler climates. This area encompasses the upper two-thirds of the contiguous United States. Conversely, warm-season grasses (like Bermuda, zoysia, St. Augustine, and centipede), are found throughout the south.

And that’s not to mention the transitional zone. Bridging the cool- and warm-season zones, this area contains both types in abundance. To complicate matters even further, some homeowners in this zone can have both in one yard! So, it’s always best to know what you’re dealing with before you mow.

Benefits of Proper Mowing Height

As with nearly everything lawn and garden-related, lawn health is at the root of knowing the right cutting height. Grass blades cut at the correct height better capture light, rain, and nutrients.

Helping the root system grow deeper, denser, stronger, and healthier. If you mow too low, you run the risk of your lawn being burned by the sun, resulting in weak roots and a potential weed infestation. Mowing too high increases the chance of excess moisture buildup, creating an environment for pests and disease to take hold.

The Golden Rule

The key to determining the right height is achieving balance. And part of that balance is found in the “Golden Rule” of mowing: never cutting more than one-third of a blade off at a time.

There’s nothing more tempting than cutting straight to the ideal height on your first mow of the year—but that does your lawn way more harm than good. Gradually lowering your deck mow by mow keeps the balance between the blades and roots in check. Preventing your lawn from going into shock—and keeping everything green and pristine.

Correct Lawn Mower Height Settings per Grass Type

With all that established, it’s time to cut to the chase: the ideal mowing height for each grass type.

Warm-season grasses are more heat-tolerant, built to thrive—and grow—in the hot southern sun. So, it’s best to drop your deck height close to its lowest setting, keeping it between one to two inches. The shorter cut promotes denser lawn growth and helps fight back against pesky weeds.

If you have a cool-season lawn, you’ll want to keep it between the two-and-a-half to four-inch range. These grasses are hardy and well-adapted to frigid winters—but aren’t as heat tolerant. The extra length shades the soil from the summer sun, retaining vital moisture to help it withstand potential droughts or prolonged heat waves.

Lawn Mower Height Settings by Season

While knowing the range goes far in helping your lawn, knowing how your mowing height changes with the season goes even further.

Spring

For the first cut of spring, lower your deck by half an inch from your normal summer cutting height. So, if you have a fescue lawn you keep at four inches during the summer, drop it to three-and-a-half for your first mow. This removes any winter-burned blades and encourages new growth. However, make sure to follow the Golden Rule and use multiple cutting sessions, if needed, to ensure the best results.

Summer

Throughout the summer, mow on the higher end of your specified range. This protects the soil from the summer heat, while retaining the moisture your lawn needs.

Fall

As fall rolls around, stay the course with your summer mowing routine (especially if you have a warm-season lawn). For those with cool-season grass, this is your yard’s prime growing time, so it’s best to up your mowing frequency.

Then, as you come up on your last session of the year, end your cutting season as you started: lowering the height by half an inch. This helps protect the roots from the harsh cold winter weather and doesn’t run the risk of snow mold taking hold.

Winter

Finally, as the winter chill sets in, it’s time to put your mower away. Most grasses go dormant during this period, so it’s the perfect time to kick back, relax, and enjoy the season.

Or, if you live in a warmer climate, you can continue to enjoy the thrill of mowing—and everything else the backyard life has to offer.

More Like This:

  • How to Sharpen Mower Blades
  • Maintain Your Mower with Exmark OEM Parts
  • Keep Your Mower Running Strong With an Exmark Maintenance Kit

Filed Under: Lawn + Garden, Mowing Tagged With: grow, Lawn + Grass Care, Outdoor Pro, plan, spring, summer

Austin Dillon’s North Carolina Dream Yard

August 2, 2024 by Exmark

As a NASCAR star, Austin Dillon is constantly questioning the moves he makes—when to pit, what line to take, and everything needed to get his number 3 car across the finish line. So it really makes all the difference when he can come home, step on his mower, and only have to worry about how straight his stripes are. The chaos and stress of racing melt away, and he’s able to relax and enjoy the simple peace of mowing. (Oh, and the rest of his family’s 60-acre dream yard, of course.) So, follow along as we visit Dillon’s property in Thomasville, North Carolina, and see how the phenom unwinds when he’s not busy burning rubber.

Rest, Relaxation, and a Great Yard

Dillion says his backyard dreams came to fruition over the pandemic. He and his wife were in the market for a new place for their growing family—especially a spot to relax and enjoy nature. When they came across this location, they both immediately fell in love. And, the fact that it was owned by NASCAR champion Terry Labonte helped close the deal. The rest is history.

But now that the Dillions have been settled in for a few years, they’ve really made this place their own. One of Austin’s favorite places is the “barn,” his go-to spot for cooking out and relaxing alongside friends and family. Once the festivities are all said and done, the barn even has a spare bedroom for guests to retire to.

But that’s not all—the barn has plenty of space for all of Dillion’s cars (which he calls his “toys”). And, of course, it’s where his favorite toy of all lives, too: his Exmark Lazer Z X-Series!

Plenty of Family Fun

Outside of the barn, Dillon likes to kick it back with his wife and kids at their pool. He says this area of his yard is critical during the summer, especially following a sweltering mowing session. After he hops off his Exmark, there’s nothing better than cooling down in the pool alongside his family.

The family fun doesn’t stop there! His son, Ace, finds nearly endless hours of entertainment on their backyard playground. And, Austin’s wife, Whitney, has planted a rose garden for their daughter, Blaze, which has become her favorite spot on the property. Not only does it look (and smell) great, but it leaves a lasting legacy for their daughter to enjoy.

A Generational Outdoor Affair

When it comes to enjoying the outdoors, Dillion got started early. Both his father and grandfather had him outside from a young age—hunting, fishing, you name it. Which is why he loves his bass pond so much. He and Ace can get outside, relax, and spend the full day reeling in small bass.

Continuing the trend of passing on his affinity for everything outdoors, Dillon has a huge garden that’s a true labor of love. His goal is to be able to grow all the produce he’ll need without taking a trip to the store—and he has a great mentor teaching him the ropes. Most of all, he wants to be able to pass these outdoor traditions and practices down to his children, helping them live off their own land when they grow up.

Ultimately, Austin Dillon says that, for him, the outdoors has so much to offer. It lets him get away from the hustle and bustle of life and everyday stresses, and really lets him disconnect. And, the maintenance his property needs fills the same exact role. It’s a lot of work, but it’s incredibly fulfilling. (Especially when he’s able to come home to an immaculate lawn.)

Austin Dillon’s Hunting Camp

The Dillon dream yard isn’t just limited to Thomasville—he has an entire hunting camp, too. Austin Dillon can’t make it there too often, but when he does there’s plenty of work to be done. Which is where his second Exmark zero-turn comes in handy—helping him mow it all in record time. Without his mower, the upkeep of both of his properties would be almost impossible.

Best of all? When he mows, he’s able to find some valuable peace of mind—and even more time to get outside and have fun with his family.

A Partnership Built on Speed

For the last four years, Austin Dillon has partnered with Team Exmark, and he couldn’t be happier. Even better, his son loves just about any- and everything with a motor, and his Lazer Z helps scratch that itch. As soon as he sees Austin start cleaning the mower, he wants in on the fun.

Austin’s yard is incredibly important to him, and there’s nothing quite like coming home to a crisp, clean lawn. The only way to maintain a yard like that, he says, is with his Exmark. And there’s no better lawn mower suited for the task. He’s able to cut a lot of grass, in not a lot of time, and get back to enjoying the best of the backyard life. We couldn’t agree more!

More Like This:

  • The Bone Collector’s Ultimate South Georgia Dream Yard
  • A Northeast Georgia Riverfront Dream Yard
  • A 24-Acre Conway, South Carolina Dream Yard

Filed Under: Outdoor Living Tagged With: Austin Dillon

Build a DIY Giant 4-In-A-Row This Weekend

June 19, 2024 by Exmark

4-in-a-row is a timeless game that’s been enjoyed by millions for decades. It’s a great way for friends and families to connect, have some friendly competition, and make core memories. So, how could you possibly make it even better? Playing it in your favorite room of your house—the backyard! (Oh, and making it giant, of course.) So, follow along in this episode of Done-In-A-Weekend projects as you add another dimension of fun to your backyard gatherings with your own DIY giant 4-in-a-row.

Click here to download the build plans:

DIY Giant 4-In-A-Row Build PlansDownload

Tools

  • Drill/driver
  • Tape measure
  • Miter saw
  • Pneumatic nail gun
  • Jigsaw
  • Brad point drill bit
  • Framing square
  • Paint brush
  • Pencil
  • Eye and ear protection
  • Dust mask
  • Sandpaper
  • Drafting compass
  • 4-in. hole saw drill bit

DIY Giant 4-In-A-Row Materials

  • (2) ¼ in. x 2 ft. x 4 ft. plywood project panels
  • (1) ½ in. x 2 ft. x 4 ft. plywood project panel
  • OR (35) ½ in.-thick, 5 in.-diameter wood or plastic discs
  • (3) 1 in. x 3 in. x 6 ft. boards
  • (1) 1 in. x 3 in. x 4 ft. board
  • (6) ½ in. x ½ in. x 3 ft. square dowels
  • (2) ½ in. x 2 in. x 3 ft. project boards
  • 1 ¼ in. pocket hole screws
  • 5/8 in. finish nails
  • 1 ¼ in. finish nails
  • (4) heavy-duty magnetic catches with counter plates
  • Wood glue
  • Paint or pre-conditioner and stain
  • Wood sealer
  • (2) hinges

DIY Giant 4-In-A-Row Build Steps

For the full cut list and build steps, open and download the PDF to get started.

Download the instructions here:

DIY Giant 4-In-A-Row Build PlansDownload

That’s it! Now all there’s left to do is invite some friends and family over, get the backyard party started, and pretend to let your kids win a few games here and there.

More Like This:

  • Build a Garden Trellis This Weekend
  • Build a Picnic Table This Weekend
  • Build a Family-Friendly Adirondack Chair This Weekend

Filed Under: Outdoor Living Tagged With: build, fall, lifestyle, plan, spring, summer, Weekend Projects

Build a DIY Living Fence This Weekend

May 29, 2024 by Exmark

A well-placed, well-built fence is the cornerstone of any great backyard. It provides privacy, hides unsightly features, keeps unwanted pests out, while keeping your own pets in, and even helps create outdoor rooms in your yard. This build takes fencing to the next level by giving your fruit trees a place to (securely) grow—and providing an opportunity for you to try your hand at espalier. Follow along in this episode of Done-In-A-Weekend Projects and discover how to build your very own living fence.

Download the build PDF here:

DIY Living Fence Build PlansDownload

Tools

  • Drill
  • Screwdriver
  • Level
  • Tape measure
  • Pencil
  • Eye and ear protection
  • Posthole digger
  • Tamper (or spare 2 in. x 4 in. board)
  • Shovel

DIY Living Fence Materials

  • (2) 4 in. x 4 in. x 8 ft. treated wood posts
  • (1) 2 in. x 4 in. x 8 ft. treated wood board
  • (1) 50 ft. reel 14-gauge outdoor wire
  • (4) Turnbuckles
  • (8) Eyelets
  • (8) Wire Rope Clamps
  • 2 ½ in. wood deck screws
  • (2) 50-lb bags fast-setting concrete

Build Steps

For the full build steps, open and download the PDF to get started.

Download the build PDF here:

DIY Living Fence Build PlansDownload

That’s it! Now all there’s left to do is pick out the perfect area of your yard, set up your living fence, and get gardening.

More Like This

  • Build a Garden Trellis This Weekend
  • How to Pick the Perfect Pruning Tools
  • Build a DIY Vertical Garden This Weekend

Filed Under: Lawn + Garden Tagged With: build, garden, lifestyle, Weekend Projects

Build a DIY Butterfly House This Weekend

May 17, 2024 by Exmark

There’s nothing sweeter than the sight of a butterfly—they add instant color and entertainment wherever they go. But how do you go about attracting, and enjoying, even more of our vibrant friends? That’s where a DIY butterfly house comes in. This build provides a home for an important pollinator, while offering endless hours of backyard fun for children and adults alike. So, follow along in this episode of Done-In-A-Weekend Projects and discover how to build your very own DIY butterfly house.

Click here to download the build PDF:

DIY Butterfly House Build PlansDownload

Tools

  • Jigsaw
  • Drill
  • Table saw
  • Tape measure
  • Pencil
  • Eye and ear protection
  • Sandpaper
  • 7/8 in. spade bit
  • 3/8 in.-diameter drill bit
  • Pliers
  • Clamps

Materials

  • (1) 1 in. x 6 in. x 10 ft. cedar board
  • (25) 4d galvanized casing nails
  • (1) ¾ in.-diameter type L copper pipe
  • (1) ¾ in. copper pipe strap
  • (2) No. 8, ½ in. pan head screws
  • Moisture-proof wood glue

DIY Butterfly House Cut List

Take the 1 in. x 6 in. x 10 ft. board and make the following cuts:

  • A. (2) ¾ in. x 5 in. x 2 ft. front and back boards
  • B. (2) ¾ in. x 5 in. x 6 ¼ in. roof boards
  • C. (2) ¾ in. x 3 ¾ in. x 22 ¼ in. side and door boards
  • D. (1) ¾ in. x 3 ¾ in. x 3 ½ in. bottom board
  • E. (2) ¾ in. x 1 ¼ in. x 3 ½ in. support pipe stop

Then, make the following cuts:

  • Take the (2) ¾ in. x 5 in. x 2 ft. front and back boards and cut the top of each board to form a 90° peak.
  • Take the (2) ¾ in. x 5 in. x 6 ¼ in. roof boards and cut a 45° bevel off one side of each board.
  • Take the (2) ¾ in. x 3 ¾ in. x 22 ¼ in. side and door boards and cut a 45° bevel off one end of each board.

DIY Butterfly House Build Steps

For the full build steps, open and download the PDF to get started.

Download the instructions here:

DIY Butterfly House Build PlansDownload

That’s it! Now all there’s left to do is set up your new build in your pollinator garden and enjoy all the beautiful sights your new DIY butterfly house has to offer.

More Like This:

  • How to Attract Butterflies With Plants
  • How to Make a Rain Garden
  • Naturalized Plants: What They Are and Why You Want Them

Filed Under: Lawn + Garden Tagged With: build, garden, lifestyle, Weekend Projects

  • Go to page 1
  • Go to page 2
  • Go to page 3
  • Interim pages omitted …
  • Go to page 11
  • Go to Next Page »

Primary Sidebar

Stay Connected

Keep living your best backyard life all year round. Get alerts on the latest Original Series updates, along with the inspiration and know-how you need to enjoy backyard life to the fullest!

Loading
  • Home
  • Mowing
  • Outdoor Living
  • Lawn + Garden
  • Ambassadors
  • Originals
  • Subscribe
  • Facebook
  • x
  • Instagram
  • YouTube
  • Pinterest

Copyright © 2025 EXMARK - Backyard Life

  • Privacy Policy
  • Terms of Use
  • DMCA

Trending