Exmark Z Turf Equipment Backyard Life
  • Skip to primary navigation
  • Skip to main content
  • Skip to primary sidebar

Exmark's Backyard Life

Living Happens Outdoors

  • Mowing
  • Outdoor Living
  • Lawn + Garden
  • Ambassadors
  • Originals
  • About Exmark
  • Subscribe to Backyard Life
Search

Wagyu Street Tacos With Greg Mrvich

August 30, 2024 by Greg Mrvich

There are very few meals that complement every season of the backyard life quite like a taco. They’re versatile, easy to make, and just taste downright great, no matter the event. So, join in as Ballistic BBQ’s Greg Mrvich throws down on the griddle and ups the ante on a humble recipe with his delicious Wagyu street tacos.

Asian-inspired Barbeque Sauce

To kick off this cook, Mrvich concocts his personal yankiniku spinoff—a savory Japanese barbeque dipping sauce. And the ingredients are simple—it’s a quick blend of soy sauce, mirin (a type of Japanese rice wine), grapefruit juice, and grated garlic and ginger. To get a really fine grate on both, Greg recommends using a microplane, which is finer-bladed than your traditional box grater.

Next, he adds in some white sugar and gochujang—a moderately spicy and earthy Korean fermented chili pepper paste which elevates any meal. Then, he tosses in sesame oil, whisks the ingredients together, and places the sauce over heat for about two to three minutes. (Or, just enough time to infuse the ginger root and garlic.) Finally, he whisks in toasted white sesame seeds and sets the sauce aside to cool, allowing all the flavors to really blend.

Asian-Inspired Dressing and Slaw

While the barbeque sauce is cooling, Greg gets to work on creating the Asian dressing and slaw to top off his Wagyu street tacos. The slaw is a simple combination of olive oil, soy sauce, rice vinegar, mirin, sesame oil, sugar, and toasted black sesame seeds, which add the perfect contract to the white sesame seeds in the sauce.

After whisking the dressing together, Greg combines finely-shredded purple cabbage and very finely-shredded white cabbage in a bowl, drizzles on the dressing, and gives it a shake until fully combined. The idea behind this combo is to enhance the flavors of the taco, all while letting the Wagyu shine. He says this mixture adds the perfect crispy, acidic taste that both complements and cuts right through the richness of the Wagyu, thanks to the vinegar.

Grilling Up the Wagyu

Now’s the time to start on this meal’s namesake—the Wagyu! For this cook, he’s using a 15-ounce New York strip, A5 Wagyu beef straight from Japan. While there might be a million-and-one Wagyu steak cook videos out there, the fact he’s making A5 tacos make this cook one-in-a-million.

Greg sprinkles on a little kosher salt and throws the meat straight on the griddle, set to medium-high heat. Since the steak is pretty thin (just about a half inch), he’s grilling it for about two minutes per side until medium-rare.

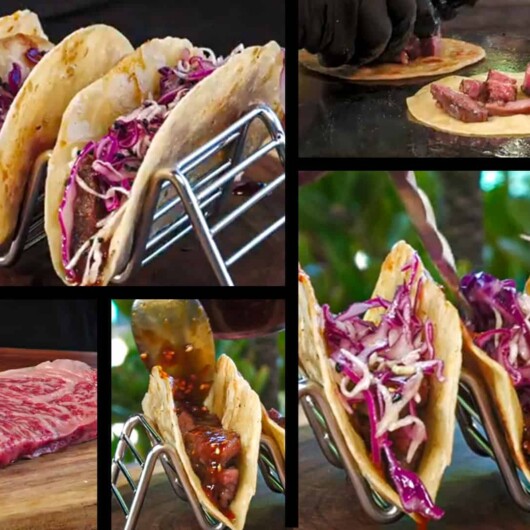
After the meat’s been grilled, he gets to work on the tortillas! Normally, for street tacos, he’d opt for corn tortillas, be he really wants to let the Wagyu shine. So, he ‘s using small, street taco-sized flour tortillas. He just drops some of the reserve Wagyu fat on the griddle, throws the tortillas on, and flips them until they have a nice toast on both sides.

Serving the Wagyu Street Tacos

After the cook’s all wrapped up, now comes the fun part: plating (and then eating, of course). First things first, he throws some chopped-up Wagyu beef on the tortillas and drizzles on the homemade sauce. He then layers on some slaw and sprinkles on more black sesame seeds for a finishing touch.

That’s it! While this certainly isn’t your standard street taco, the inclusion of Wagyu make it worthy of even the highest-end chophouse menu. Mrvich calls it a “novelty” recipe, but one that pays respect to the meat and is bound to impress any guests you might have over, regardless of the occasion.

Wagyu Street Tacos With Greg Mrvich
Pin
Print

Wagyu Street Tacos With Greg Mrvich

Wagyu Street Tacos Ingredients

  • Japanese-inspired Dipping Sauce
  • ¼ cup Soy sauce

  • 2 tbsp Mirin

  • 1 tbsp Grapefruit Juice

  • 1 clove Garlic (finely grated)

  • 1 tsp Ginger (grated)

  • 1 tsp Gochujang

  • 1 tbsp White sugar

  • 2 tsp Sesame oil

  • 1 tsp Toasted sesame seeds (white)

  • Asian Slaw Dressing
  • ½ cup Olive oil

  • 2 tbsp Soy sauce

  • 2 tbsp Rice vinegar

  • 1 tbsp Mirin

  • 2 tbsp Toasted sesame oil

  • 1 tbsp White sugar

  • 1 tbsp Toasted black sesame seeds

  • Asian Slaw
  • 1 cup Purple cabbage (finely shredded)

  • 1 cup White cabbage (finely shredded)

  • Wagyu Street Tacos
  • 15 oz Wagyu New York strip steak

  • Kosher salt

  • Small flour tortillas

  • Reserved Wagyu fat

Wagyu Street Tacos Steps

  • Make the Dipping sauce
  • In a small sauce pan, combine the soy sauce, mirin, grapefruit juice, grated garlic, and grated ginger.
  • Add the gochujang, white sugar, and sesame oil.
  • Heat the mixture over medium heat for 2 to 3 minutes, whisking continuously until the sugar and gochujang are dissolved and garlic and ginger are infused.
  • Once the sauce is ready, stir in the toasted sesame seeds. Set the sauce aside to cool.
  • Prep the Asian Slaw Dressing
  • In a bowl, whisk together the olive oil, soy sauce, rice vinegar, mirin, toasted sesame oil, white sugar, and toasted black sesame seeds until well combined.
  • Make the Slaw
  • In a large bowl, combine the shredded purple and white cabbage.
  • Lightly dress the cabbage with the Asian slaw dressing. Toss the slaw gently until evenly coated and set aside.
  • Cook the Wagyu Steak
  • Preheat griddle or skillet to medium-high heat.
  • Season the Wagyu steak with kosher salt.
  • Cook the steak for about 2 minutes per side until medium-rare. (NOTE: the steak should be about ½ in.-thick.)
  • Remove the steak from the heat and let it rest for a few minutes.
  • Slice the steak thinly, trimming off excess fat if desired.
  • Assemble and Serve
  • Heat the flour tortillas on the griddle using reserved Wagyu fat until warm and slightly crispy.
  • Place a few slices of Wagyu steak on top.
  • Spread a small amount of the homemade dipping sauce on each tortilla.
  • Add a spoonful of the Asian slaw on top of the steak.
  • Garnish with additional sesame seeds, if desired.
  • Serve the tacos immediately while warm.

More Like This

  • Greg Mrvich’s Copycat Le Barchen Mac Wagyu Burger
  • Greg Mrvich’s Grilled Jamaican Jerk Chicken Recipe
  • Ballistic BBQ Asian Ribs Recipe

Filed Under: Outdoor Living Tagged With: cook, fall, lifestyle, spring, summer

David Bancroft’s Iron Chef Hot-Honey Ribs

June 26, 2024 by David Bancroft

As a James Beard-nominated chef, it’s safe to say that Exmark Ambassador David Bancroft knows a thing or two (or three) about whipping up a mean rack of ribs. In fact, his ribs helped propel him to victory on Food Network’s Iron Chef Showdown in 2018. So, follow along in this Backyard Life article as the champ dishes out his Iron Chef Hot-Honey Ribs, complete with pecan streusel crumble.  

Kicking off the Cook

To start this Iron Chef recipe, David preheats his smoker to 225° F, and gets to work on his homemade dry rub. The rub is a simple combination of chili and garlic powder, cumin, thyme, brown sugar, salt, and black pepper. Once he’s combined the spices in a bowl, he generously seasons the ribs and moves them straight to the smoker rack.

For the best results, Bancroft says to leave the ribs on the rack for about two and a half to three hours (or until tender). Then, remove the ribs from the smoker, wrap them in foil, and let them rest for 20 minutes. 

Putting the “Hot Honey” in Hot-Honey Ribs

After throwing his ribs on the smoker, David starts on his custom hot-honey sauce. (It wouldn’t be a “hot-honey ribs” recipe without the “hot-honey,” after all!) Even better, this part of the cook really allows you to make it your own. Bancroft says you can use whatever hot sauce suits your fancy. All you have to do is whisk a cup of your favorite hot sauce with a cup of honey! It’s really that simple.

Concocting the Pecan Streusel

When baking up his pecan streusel, Bancroft has a few words of advice. First and foremost, he says not to over-mix the ingredients in the food processor. You want it to be nice, crumbly, and light. Over-mixing it will create an extra crisp and compact mixture that doesn’t have nearly as great a texture or flavor. And, while the streusel is baking in the oven, make sure to stir it every five minutes to keep it from burning. While he recommends a baking time of 20 to 30 minutes, he says you’ll know it’s ready when it has a nice golden-brown finish.

Plating the Hot-Honey Ribs

Once the ribs have been removed from the smoker, glaze whipped up, and streusel baked, it’s nearly time to dig in! But first, David says to slice the racks into individual bones to maximize the coverage of glaze and streusel. Then, simply layer on the glaze, liberally sprinkle on the streusel, and serve immediately. Your friends and family are bound to be left wondering if you’ve won a competition or two with this mouthwatering cook.

David Bancroft’s Iron Chef Hot-Honey Ribs
Pin
Print

David Bancroft’s Iron Chef Hot-Honey Ribs

Serves

4-8

people

Iron Chef Hot-Honey ribs Ingredients

  • Iron Chef Ribs
  • 2 racks St. Louis style ribs

  • Dry Rub
  • 1 tbsp. Chili powder

  • 1 tbsp. Garlic powder

  • 1 tsp. Cumin

  • 1 tsp. Thyme

  • 2 tsp. Brown sugar

  • 1 tbsp. Salt

  • 1 tsp. Black pepper

  • Hot-Honey Sauce
  • 1 cup Hot sauce (your preference)

  • 1 cup Honey

  • Pecan Streusel
  • 1½ cups Pecans

  • 1 cup Brown sugar

  • ½ cup Sugar

  • 3 oz. Flour

  • 1 tbsp. Kosher salt

  • 3 oz. Cold butter

Iron Chef Hot-Honey ribs STEps

  • Dry Rub and Hot-Honey Sauce
  • Combine the dry rub spices in a small bowl and season the ribs generously.
  • Then, combine the hot-honey sauce ingredients in a small bowl and whisk until combined. Set it aside.
  • Iron Chef Ribs
  • Preheat your smoker to 225° F.
  • Place seasoned ribs on smoker rack and allow it to cook for two and a half to three hours, or until tender.
  • Remove ribs from smoker and wrap in foil. Allow to rest for 20 minutes.
  • Pecan Streusel
  • Pre-heat oven to 350° F.
  • Pulse all ingredients—except butter—in food processor until a crumble forms. (Do not over-mix.)
  • Remove the crumble from the processor, pour into a bowl, and mix in the butter by hand.
  • Spoon the crumble onto a sheet tray and place in the oven for 20 to 30 minutes, stirring every 5 minutes to ensure the outsides don’t burn.
  • Once cooked evenly to a golden brown, remove the streusel from the oven and let it cool at room temperature.
  • Plating
  • Remove the ribs from the foil and slice into individual bones.
  • Glaze the freshly cooked ribs with hot-honey sauce and sprinkle on the streusel liberally. Serve immediately!

More Like This:

  • David Bancroft’s Top Herbs for Grilling
  • David Bancroft’s Fried Green Tomatoes
  • Wild Game Side Dish: Homemade Tater Tots

Filed Under: Outdoor Living Tagged With: cook, plan

Greg Mrvich’s Copycat Le Barchen Mac Wagyu Burger

May 24, 2024 by Greg Mrvich

In this Backyard Life video, join Ballistic BBQ’s Greg Mrvich as he cooks his copycat Le Barchen Mac Wagyu burger. This recipe is based off a mouthwatering burger from the famous Barchen Beer Garden in Omaha, Nebraska—just 90 minutes away from Exmark HQ in Beatrice!

Mrvich’s Mac Sauce Steps

To kick off this cook, Greg throws together his Mac sauce (which he calls an elevated Big Mac sauce). He places the ingredients in a bowl, with the melted beef Wagyu fat last, and starts mixing immediately. This ensures that the tallow fully emulsifies into the sauce, creating a rich flavor to kick the burger up a notch. Once finished, he sets aside the sauce and gets started on the main part of the cook: the meat.

Grinding the Meat

But before he gets started forming the patties, Mrvich clarifies that his recipe slightly deviates from the real deal. Barchen Beer Garden uses straight American Wagyu for their dish, but he’s using a custom grind of Japanese A5 chuck steak and American Wagyu. He calls his American Wagyu an “ugly cut,” which is simply an end trimming off a rib roast. But for the purposes of making ground beef, it’s perfect.

After Greg hammers out the patty details, he cuts the meat into more manageable cubes and breaks out the grinder, utilizing a coarse chili grind plate. It creates the perfect, chunky texture that you just don’t get from store-bought ground Wagyu (which tends to be too thin and pasty for his liking).

Then, Greg adds the Japanese A5 alongside the Wagyu, chunk by chunk, to ensure they’re fully mixed. Once fully ground, it’s time to grill!

Grilling and Plating the Le Barchen Mac Wagyu Burger

Before setting the meat on the griddle (running at medium high) Mrvich creates two, loosely packed meatballs. He then tosses them on the griddle and flattens them with a spatula, forming thin patties.

While the first side of the patties start to grill, Greg sprinkles on some salt and throws a spoonful of Wagyu beef tallow on one side of the griddle. He also adds the buns to the flat top, adding a nice toast to the bread.

After flipping over the patties, he tops both with a slice of American yellow cheese and encloses them in a griddle dome. He keeps it on just until the cheese is melted, and the patties are cooked through.

Once cooked, now the fun begins: plating. Mrvich takes the bottom bun and throws on a bed of iceberg lettuce. He then tops it with both patties, a couple of his homemade pickles, and some paper-thin red onion rings. He finishes off this cook with the top bun, which he’s spread with his delicious Mac sauce.

And that’s it! Now that you have your own Le Barchen Mac Wagyu burger assembled, all there’s left to do is chow down.

Greg Mrvich’s Copycat Le Barchen Mac Wagyu Burger

Le Barchen Mac Wagyu Burger Ingredients

  • 8 oz. Japanese A5 chuck steak

  • 8 oz. American Wagyu beef

  • 4-5 Pickle chips

  • 2 slices American yellow cheese

  • Hamburger buns

  • Iceberg Lettuce (shredded)

  • Red onion (thinly sliced)

  • Mac Sauce Ingredients
  • ½ cup Japanese mayo

  • 1 ½ tsp. Sweet pickle relish

  • 1 ½ tsp. Hot German mustard

  • 1 tsp. White sugar

  • ½ tsp. Red wine vinegar

  • ½ tsp. Paprika

  • ½ tsp. Garlic powder

  • ½ tsp. Onion powder

  • 1 tsp. Melted beef Wagyu fat

Le Barchen Mac Wagyu Burger Steps

  • Place all of the Mac sauce ingredients in a bowl, with the melted beef Wagyu fat last, and mix immediately to ensure the tallow emulsifies into the sauce.
  • Cut the Japanese A5 chuck steak and the American Wagyu beef into small cubes.
  • Place the meat into the grinder, adding the Japanese A5 alongside the American Wagyu, chunk by chunk, to ensure they’re fully mixed together.
  • Once ground, form two, loosely packed 4 oz. meatballs.
  • Warm up flat top to medium-high and place the meatballs on the griddle, flattening them with a spatula to form thin patties.
  • Sprinkle salt on both patties and add a spoonful of Wagyu beef tallow to the side.
  • Add buns to the griddle until toasted.
  • Flip over the patties, adding a slice of American cheese to both, and place a griddle dome over them.
  • Remove griddle dome once the cheese is melted and patties are cooked through. Then, remove the patties from the grill.
  • Place iceberg lettuce on the bottom bun and layer on the two patties. Then, add pickles and red onion rings.
  • Spread the Mac sauce on the top bun and place it on the burger to finish the cook.

Notes

  • If you’re making this cook at home, you don’t necessarily need to use Wagyu, but it adds a texture that just can’t be beat.
  • The iceberg lettuce might not add much flavor to the burger, but it adds a lot of texture that elevates the eating experience.
  • The acid from the pickles cuts into the fatty richness of the Wagyu patties.
  • The red onion rings add a crunchy, spicy bite to the burger.

Filed Under: Outdoor Living Tagged With: cook, lifestyle, spring, summer

Michael Waddell’s Tasty Elk Chili

December 4, 2023 by Michael Waddell

Winter is well under way—and so are those blisteringly cold mornings and too-early, frigid nights. What better way to beat that unforgiving weather, or warm up from a day full of hunting ducks and deer, than with a steaming bowl of chili? Join the Bone Collector, Michael Waddell, as he “trespasses” on his wife’s kitchen and whips up his tasty elk chili.

How Waddell Makes His Elk Chili Unique

Waddell jokes that chili is one of the most controversial dishes in the world. There are as many spices as there are options when it comes to making it! He loves his version because it’s cheap, easy to make, and flat-out tastes great. And it’s perfect if you’re looking to feed an army—especially during deer camp.

For this recipe, he uses two pounds of elk burger that he got in Utah, but he says you can use whatever wild game suits your fancy. He prefers elk because it’s lean, tastes more like beef than deer does, and is healthier than plain ground beef.

To really make his elk chili pop, Michael uses a bit of bacon grease from breakfast to brown the meat. He admits any healthiness the elk provides is lost, but it adds a flavor to the chili that just can’t be beat. And, while browning, Waddell warns against wanting to overcook it. He says people tend to overcook wild game, mainly since it’s “dirty” from being exposed to the wilderness. But cooking it rare or medium throws the taste over the top.

Showing that he’s as “country as a chicken coop,” he breaks out his jars of fresh tomatoes that he and his wife canned themselves a while ago. He admits that you can also use store-bought cans of diced tomatoes—but they won’t taste nearly as great as the home-grown stuff.

When it comes to chili spices, there are nearly endless ways to mix and match—and Waddell says you can use whatever you want. But for his recipe, he uses what he calls “the bomb”: a simple packet of French’s Chili-O. Paired with a can of Rotel, some black beans, and onions, it adds that perfect chili taste.

To wrap up this cook, Waddell whips up some instant jasmine and brown rice. When plating, he likes to put down a layer of rice and then spoons some chili on top. It makes for a great, easy alternative to cornbread and helps you get that nice starch fixin’. When it’s all said and done, Waddell says this cook will warm your bones and have you eating like a king.

Michael Waddell's Elk Chili
Pin
Print

Michael Waddell’s Elk Chili

Cuisine: Wild Game, AmericanDifficulty: Easy

Michael loves this version because it’s cheap, easy to make, and flat-out tastes great. Plus, it’s perfect if you’re looking to feed an army—especially during deer camp.

Elk Chili Ingredients

  • 2 cans Diced tomatoes

  • 1 can Rotel

  • 2 small cans Mushrooms

  • 1 can Black beans

  • 1 packet Chili seasoning

  • 1½ – 2 lbs. Elk burger

  • 2 Yellow onions (diced)

  • Cajun seasoning (to taste)

Elk Chili Directions

  • Place the elk burger in a skillet and cook until just browned.
  • Sprinkle Cajun seasoning over meat, to taste.
  • Once meat is browned, drain any excess oil and grease, and add in diced yellow onions. Continue to cook until the onions are soft.
  • Transfer the meat and onions to a large soup pot, and add Rotel, diced tomatoes, mushrooms, and black beans. Stir the pot until ingredients are thoroughly mixed.
  • Once mixed, stir in the chili seasoning and bring mixture to a simmer until warmed throughout.

Notes

  • For additional flavor, brown your ground elk with a bit of bacon grease.
  • Serve the chili over rice (either jasmine or brown), with a bit of cornbread, or top it off with crackers of your choice.
  • You don’t have to stick with black beans—kidney or pinto beans work just as well.
  • To bring even more flavor out, throw the ingredients into a slow cooker. A slow simmer and all-day cook will work wonders.
  • If you want your elk chili a little soupier—throw a little more water in. Or, if you want it a little thicker—add some flour or cornstarch.

More Like This:

  • David Bancroft’s Cast Iron Brisket Brunswick Stew and Cornbread Combo
  • Wild Game Cooking Tips with Michael Waddell
  • Joe Thomas’ Moose Chili Recipe

Filed Under: Outdoor Living Tagged With: cook, Michael Waddell, Outdoor Pro

Prime Cuts: Cast Iron Cornbread Recipe

October 17, 2023 by Exmark

You’d be hard-pressed to find a traditional southern meal that doesn’t come with a side of cornbread. It’s a versatile dish that pairs well with just about any food under the sun. But did know you only need a single cast iron skillet to create cornbread that’s bound to be a backyard party showstopper? Join chef and restaurateur, David Bancroft, and his friend John Cassiumus as they as they show you how to make this homemade cornbread recipe in a miniature cast iron skillet during our recent Prime Cuts: Cast Iron Edition video.

History of Cornbread

Cornbread’s become a mealtime staple for any manner of southern recipe. But did you know its origins predate the American colonies by a few hundred years—if not longer? Corn was a staple crop for Native Americans, used make a wide variety of dishes—cornbread among them. They would often add chestnuts, sunflower seeds, apples, or berries (and sometimes even beans or potatoes) to enhance the flavor of the simple batter.

Once the American colonies started to be developed, cornbread became a meal of necessity for the southern settlers, who struggled to grow European wheat and rye in the hot and humid summers. But it wasn’t until the early 1800s that the cornbread we all know and love came into existence, when farmers started adding buttermilk, eggs, baking soda, baking powder, and pork products to get the most flavor out of this simple dish.

How Bancroft Makes this Recipe His Own

To really perfect this dish, David likes to let his cast iron get as hot as possible, which creates a nice, crispy sear for the crust. That ups the subtle crunch factor when it’s time to dig in. But it’s not just extreme heat alone that makes his homemade cornbread recipe so great. He likes to use his “secret ingredient” at every opportunity he can: melted salted butter.

And, to push the flavor to the next level, Bancroft tops his cornbread with a sprinkling of benne seeds. Benne seeds are heirloom sesame seeds that have become popular in the South Carolina Lowcountry. They add a perfect toasty, nutty flavor that pairs great with the savory cornbread, hot sauce, and crispy crust.

Once this cook is all said and done, Bancroft says to cut it into smaller portions and share right away. Oh, and don’t forget to pair it with some delicious brisket Brunswick stew, too!

Cast Iron Cornbread Recipe
Pin
Print

Cast Iron Cornbread Recipe

Cuisine: AmericanDifficulty: Easy
Servings

4

servings
Total time

20

minutes

Ingredients

  • Batter
  • 520 g. Cornmeal

  • 365 g. All-purpose flower

  • 220 g. Sugar

  • 1½ tbsp. Baking powder

  • 1½ tbsp. Kosher salt

  • 3 eggs

  • 815 g. Whole milk

  • 150 g. Melted butter

  • Honey Hot Sauce Butter
  • ¼ lb. Salted butter (melted)

  • ½ cup Local honey

  • 3 tbsp. Hot sauce (your choice)

  • Cornbread Topping
  • 1 package Benne seeds

Directions

  • Batter
  • Mix cornmeal, all-purpose flower, sugar, baking powder, and kosher salt together in a large bowl.
  • In a separate bowl, mix the eggs and milk together.
  • Add the wet ingredients to the dry mixing bowl and whisk until smooth.
  • Add the melted butter and whisk again until smooth.
  • Let chill for one hour.
  • Honey Hot Sauce Butter
  • Whisk all the ingredients together until smooth, adjusting the hot sauce to your preference.
  • Place to the side until the cornbread is fully baked.
  • Baking
  • Preheat oven to 375° F and heat cast iron skillet over medium-high on the range. Add butter until melted.
  • Pour enough batter to fill the skillet to almost 3/4th of the way full.
  • Once the edges begin to roll over, place the skillet into the oven for about 12 to 14 minutes.
  • Remove from oven. (Note: At this point, the cornbread should be slightly underdone in the center and start to form a crown towards the top.)
  • Flip the cornbread upside down onto a plate and slide it back into the skillet, now with the bottom side facing up.
  • Return the skillet to the range on medium heat and cook for another 30 seconds.
  • Spoon on the honey hot sauce glaze until the top of the cornbread is evenly coated. Allow it to simmer for 60 seconds on medium heat.
  • Remove from the range and sprinkle benne seeds over the top to serve.

Notes

  • This recipe is designed for smaller skillets but can still be oven-baked all the way through on a larger skillet. However, using a larger skillet means it can’t be flipped over.
  • If you can’t easily find benne seeds, sesame seeds are a great alternative.

More Like This:

  • Joe Thomas’ Moose Chili Recipe
  • White Chicken Chili Recipe
  • Ballistic BBQ Asian Ribs Recipe

Filed Under: Outdoor Living Tagged With: Backyard Grilling, cook, David Bancroft

Prime Cuts: Cast Iron Brisket Brunswick Stew Recipe

October 17, 2023 by Exmark

With cooler weather around the corner, it’s almost time to start breaking out your cast iron pots to whip up a meal that’ll warm you to the bone on those chilly nights. And what better way to warm up during your backyard gatherings than with a mouthwatering bowl of brisket Brunswick stew? You can watch chef and restaurateur, David Bancroft, and his friend John Cassiumus as they bring this legendary recipe to life—creating a hearty brisket Brunswick stew using nothing but a cast iron pot in our recent Prime Cuts: Cast Iron Edition video.

History of Brunswick Stew

Brunswick stew has long been one of the definitive southern dishes, getting its start as an end-of-harvest-season recipe where leftover veggies and grains were cooked with whatever small game could be found to create an incredibly hearty meal. However, this dish is one that comes with a fair bit of controversy, too: towns in both Virginia and Georgia claim to be the birthplace of this famous stew—and both even have a statue of a cast iron pot to try and further solidify their claim! Regardless of its origins, there’s no doubt that this dish is one that will have your friends and family coming back for seconds (or even thirds).

How Bancroft Makes It His Own

To up the ante on his stew, David is using fresh pit-smoked brisket from his restaurant Bow & Arrow, which he had going for about 18 hours, “low and slow,” in the pit. After those 18 hours were through, he wrapped it up in some butcher paper and threw it back in the pit for a little while longer to get a perfect melty, smoky flavor.

David also says that Brunswick stew is always better the next day—giving time for all the seasonings and aromas to settle and mingle together really makes the flavor pop. Whether you wait a day or not, this recipe will instantly be backyard party-ready and perfect to pair with some home made cornbread right out of the skillet.

Cast Iron Brisket Brunswick Stew
Pin
Print

Cast Iron Brisket Brunswick Stew

Course: MainCuisine: AmericanDifficulty: Easy
Servings

4

servings
Total time

45

minutes

Ingredients

  • 2 tbsp. Peanut oil

  • 1 Large white onion (diced)

  • 2 Poblanos (seeded and diced)

  • ¼ cup Worcestershire sauce

  • (1) 28 oz. can San Marzano tomatoes

  • (2) 12 oz. bag Frozen butter beans

  • (2) 14½ oz. cans Creamed corn

  • 1 cup BBQ sauce (your choice)

  • 2 to 4 Bay leaves

  • 32 oz. Beef stock

  • 1 to 1½ Cups Brisket (chipped/chopped/shredded)

  • ¾ to 1½ BBQ spice rub (to taste)

Directions

  • Add peanut oil, diced onions, and diced poblanos to a medium stew pot or kettle and simmer until the veggies are soft.
  • Take each San Marzano tomato and crush into smaller pieces by hand. (If you want a little more tomato flavoring, pour the remaining tomato juice from the can into the pot.)
  • Bring the pot to a simmer and add in the butter beans, creamed corn, bay leaves, and Worcestershire sauce, and let simmer for another 5 minutes.
  • Add in the beef stock and your choice of BBQ sauce and bring to a slow simmer for 10 minutes.
  • Add brisket meat in the consistency of your liking—either chipped, chopped, or shredded.
  • Bring to a slow simmer and adjust the seasoning and salt content using your favorite BBQ spice rub.

Recipe Video

Notes

  • The amount of BBQ spice rub used may vary depending on the original salt content of the BBQ sauce and brisket you use—it’s all personal preference.
  • If cooking with cast iron, make sure your kettle is properly seasoned before you add in the Worcestershire sauce.
  • You don’t have to limit yourself to brisket for this meal—any type of meat will work perfectly.

More Like This:

  • Joe Thomas’ Moose Chili Recipe
  • White Chicken Chili Recipe
  • Prime Cuts: Sous Vide Wild-Turkey on the Grill

Filed Under: Outdoor Living Tagged With: Backyard Grilling, cook, David Bancroft

  • Go to page 1
  • Go to page 2
  • Go to page 3
  • Interim pages omitted …
  • Go to page 12
  • Go to Next Page »

Primary Sidebar

Stay Connected

Keep living your best backyard life all year round. Get alerts on the latest Original Series updates, along with the inspiration and know-how you need to enjoy backyard life to the fullest!

Loading
  • Home
  • Mowing
  • Outdoor Living
  • Lawn + Garden
  • Ambassadors
  • Originals
  • Subscribe
  • Facebook
  • x
  • Instagram
  • YouTube
  • Pinterest

Copyright © 2025 EXMARK - Backyard Life

  • Privacy Policy
  • Terms of Use
  • DMCA

Trending