Exmark Z Turf Equipment Backyard Life
  • Skip to primary navigation
  • Skip to main content
  • Skip to primary sidebar

Exmark's Backyard Life

Living Happens Outdoors

  • Mowing
  • Outdoor Living
  • Lawn + Garden
  • Ambassadors
  • Originals
  • About Exmark
  • Subscribe to Backyard Life
Search

Wild Game Side Dish: Homemade Tater Tots

May 2, 2023 by David Bancroft

There isn’t a bad way to make potatoes, but tater tots are always a favorite side dish. Exmark ambassador and James Beard nominee, David Bancroft, gave us this delicious homemade tater tot recipe as his perfect wild game pairing for hunt camp. He tosses together the American classic, with a spin of course, by adding a tasty poblano dressing your guests are going to go wild for!

Try these tasty tater tots with your favorite wild game meat or pair them with this Fried Wild Turkey Nuggets recipe.

More About the Tater Tot

Have you ever wondered where tater tots come from? It’s such a common food, but how did it come about? Believe it or not, it’s a simple history, but an interesting one!

According to US. Foods, Ore-Ida’s F. Nephi Grigg created the tater tot in 1953. He wanted to use the leftover potato shavings that came from creating frozen French fries. Ore-Ida actually owns the name “tater tot” and they’re known by different names in other places. A fun fact: in Australia, they’re known as “potato gems.” 

David Bancroft’s Tater Tot Twist

Bancroft has, yet again, taken the average food and turned it into something extraordinary in this recipe! He marries tater tots and cool ranch seasoning to create a bite that will leave your guests wanting more. And you’ll have it! Because this recipe makes plenty to share around. Along with the tasty potato bites, he’s also created a terrific poblano ranch dressing that will go side-by-side with the tots and could even go perfectly with some carrot sticks or celery if you run out of the crispy bites.

Wild Game Side Dish: Cool Ranch Tater Tots
Pin
Print

Wild Game Side Dish: Cool Ranch Tater Tots

Course: SidesCuisine: AmericanDifficulty: Easy
Servings

4

servings
Total Time

25

minutes

Ingredients

  • Tater Tots
  • 8 oz crispy fried Ore-Ida Golden Tater Tots (about 25pcs)

  • 1-2 tsp cool ranch seasoning (make sure to season generously)

  • ¼ cup poblano ranch dressing

  • 1 diced jalapenos (seeds optional)

  • fresh chopped cilantro (optional)

  • 2 qts peanut oil

  • Cool Ranch Seasoning
  • Hidden Valley Original Ranch Salad Dressing Mix, 1oz packet

  • ½ tsp garlic salt

  • ½ tsp onion powder

  • ¼ tsp cumin

  • ¼ tsp cayenne

  • Poblano Ranch Dressing
  • Hidden Valley Original Ranch Salad Dressing Mix, 1oz packet

  • 1 cup dukes mayo

  • ½ cup sour cream

  • ¼ cup buttermilk

  • 1 large charred, peeled, seeded poblano

Directions

  • Tater Tots
  • Heat frying oil to 350f in a medium sauce pot.
  • Fry tots until crispy golden brown. (I like mine extra crispy!)
  • Remove tots from oil and place onto a plate or cookie sheet lined with paper towel.
  • Immediately season hot tots with the cool ranch spice.
  • Place tots in serving bowl and drizzle poblano ranch generously over the top.
  • Garnish with fresh jalapeno and cilantro.
  • Add some crumbled cotija cheese over the top if you like.
  • Serve immediately while the tots are hot and crispy!
  • Cool Ranch Seasoning
  • Mix all spices together.
  • Add more cayenne or remove it to match your preference.
  • Poblano Ranch Dressing
  • Place sour cream, buttermilk, roasted poblano, and contents of 1oz ranch packet in a blender.
  • Blend until completely smooth.
  • Add mayo and poblano sauce to mixing bowl and whisk until completely smooth.
  • Chill before serving.

Whether you dishing up this side at your next hunt camp or backyard bash, a big batch of these tater tots is sure to get the party started for even the pickiest of eaters. Because who could hate tots?

More Like This:

  • Fall Garden Vegetable Side Dishes from David Bancroft
  • Wild Game Cooking Tips with Michael Waddell
  • Prime Cuts: Sous Vide Wild-Turkey on the Grill

Filed Under: Outdoor Living Tagged With: cook, David Bancroft

Tex-Mex Chicken Fajita Tacos

March 8, 2023 by David Bancroft

Craving the delicious, savory taste of a chicken fajita? Maybe you’re in the mood for some spicy tacos? This recipe from famous restaurateur and James Beard-nominee David Bancroft marries two of the best Mexican dishes in a Tex-Mex style that’s absolutely mouthwatering. And if Bancroft’s multiple restaurants, awards and nominations, and years of experience aren’t enough, he’s also a San Antonio native, making him a bonafide expert on the blending of Texan and Mexican cuisines.

Read on and learn how to whip up a batch of Bancroft’s delicious chicken fajita tacos recipe (with an amazing street corn slaw on the side).

Fun Facts about Tex-Mex

But before you get to grilling up this chicken fajita tacos recipe, why not read on about some of its history first?

The term “Tex-Mex” didn’t originate with the cuisine! It actually came to be back in 1875 when the Texas Mexican Railway—which ran from Corpus Christi to Rancho Banquete—took on the moniker “TexMex.” But the food we all know and love came from the Rio Grande Valley. However, San Antonio is where it really gained its fame. San Antonio’s “chili queens” gained national and international recognition for their delicious creations that were a never-before-seen blend of Texan and Mexican cultures and tastes.

But it wasn’t until Diana Kennedy wrote a book called Cuisines of Mexico that created a rift between “real” (authentic) Mexican food and Mexican food that was made North of the border. That’s when the term really took off throughout the food scene in the United States. 

Tex-Mex Chicken Fajita Tacos
Pin
Print

Tex-Mex Chicken Fajita Tacos

Servings

4

servings

Ingredients

  • Chicken Fajita Tacos
  • (6) 6-7 oz grilled chicken fajita breasts, sliced or pulled

  • 4 cups shredded cabbage/slaw mix

  • 1 head chopped cilantro

  • 1/2-3/4 cup street corn mayo

  • 1 cup pickled jalapenos

  • lime wedges per each taco

  • warm flour tortillas, 1 per taco

  • shredded pepper jack cheese optional

  • Street Corn Mayo
  • 1 cup water

  • 1/3 cup raw or frozen corn (not canned)

  • 2 limes & zest

  • 2 dried guajillo chilies seeded (sub 1 tsp chili powder if unavailable)

  • 2 chile de arbol w/ seeds (sub a dash of cayenne if unavailable)

  • 1 tsp paprika

  • ½ tsp garlic powder

  • ¼ tsp cumin

  • ¼ tsp salt

  • 2 cups Duke’s mayo

Directions

  • Chicken Fajita Taco
  • Wrap tortillas in aluminum foil and place into warm oven.
  • Toss cabbage/slaw mix with street corn mayo.
  • Add the mayo as needed to match your preference for creaminess of the slaw.
  • Slice warm fajita chicken into thin strips.
  • Place about 2 oz of chicken into each tortilla and then top with street corn slaw.
  • Garnish each taco with pickled jalapenos, shredded pepper jack cheese, fresh cilantro, and lime wedges.
  • Serve immediately while still warm! Goes great with chips & salsa and icy-cold salty margaritas!
  • Street Corn Mayo
  • Add water, corn, lime, chilies, garlic, and spices to small sauce pot.
  • Bring water to a low simmer for two minutes and cut heat.
  • Pour the corn mix into blender (Vitamix brand blender works best to get a smooth texture) and emulsify until completely smooth and then allow to cool.
  • Place mayo and the corn puree into small bowl and whisk together until completely smooth.

More Like This:

  • The Best Grilled Mahi Mahi Fish Tacos
  • White Bass Taco Recipe
  • Back to the Basics: Homemade Guacamole

Filed Under: Outdoor Living Tagged With: cook, David Bancroft

David Bancroft’s Smoked Texas Hot Links

January 27, 2023 by David Bancroft

Spend some time handcrafting these delicious Texas hot links alongside James Beard nominee and restauranteur David Bancroft as he takes you through his favorite hot links recipe. If you’ve never had fresh sausage, you’re in for a real treat. There’s nothing quite like it! Thinking about making homemade sausage might seem intimidating, but with Bancroft’s help, you’ll make quick work of it.

Sausage-making has a rich history and has long been a favorite activity of hunters and butchers alike. Making sausage allows you to ensure you’re making the most of every bit of meat you have, so you don’t waste any of your hard-won meats. Sausage is also a great option if you’re looking to freeze some for later use. Sausage freezes and cooks from frozen easily with very little taste change. Because who wants to compromise on flavor? You can keep it for up to three months frozen and can freeze it from fresh or from cooked. 

Bancroft likes to prepare fresh sausages using metric units because using grams and kilograms for measurement allows for a much more accurate recipe. That’s especially true because every butcher wants to utilize all the leftover meat they have when making sausage so that weight is always varying. This recipe allows you to easily scale up or down no matter what starting weight you’re working with so you can make sausage in any situation, even if you’ve just got a little bit of meat leftover for one batch and far too much for the next.

For example:

1kg meat = 1000g

1000g X .018 salt = 18g salt

100,000g meat X .018 salt = 1,800g salt

If you need some extra support for these conversions, Culinary Schools has a super helpful conversion calculator that’s easy to use.

Now that you’ve got the conversions under control, it’s time to get started learning how the sausage is made.

David Bancroft’s Smoked Texas Hot Links
Pin
Print

David Bancroft’s Smoked Texas Hot Links

Servings

4

servings

Ingredients

  • 50% beef chuck

  • 50% Boston butt

  • .018 grams Salt

  • .0025 grams #1 pink salt (sodium nitrite)

  • .007 grams Pepper

  • .002 grams Sugar

  • .02 grams Paprika

  • .004 grams Red pepper

  • .006 grams Fresh minced Garlic

  • .01 grams Ice water

Directions

  • Trim meats and chop into 1-inch cubes for grinding.
  • Weigh meats in grams/kilograms.
  • Follow the measurements for each spice and mix together the sausage cure.
  • Mix cure over meats and marinate for 3-4 hours.
  • Grind sausage and set in mixing bowl.
  • Add ice water and dry milk powder and fold mix until completely incorporated.
  • Stuff in hog casings and allow to rest in fridge for 1 hour before cooking or smoking.
  • Bancroft recommends smoking sausages slowly at 180° until they reach around 160° or sausage casing gets nice and crisp.

Enjoy your delicious Texas hot links recipe at your next party or backyard event!

More Like This:

  • David Bancroft’s Beef Brisket Melt
  • David Bancroft’s Smoked Venison Jerky Recipe
  • What’s Inside Michael Waddell’s Deer-Processing Kitchen

Filed Under: Outdoor Living Tagged With: Backyard Grilling, cook, David Bancroft

Brisket Stuffed Jalapeño Poppers Recipe

January 3, 2023 by David Bancroft

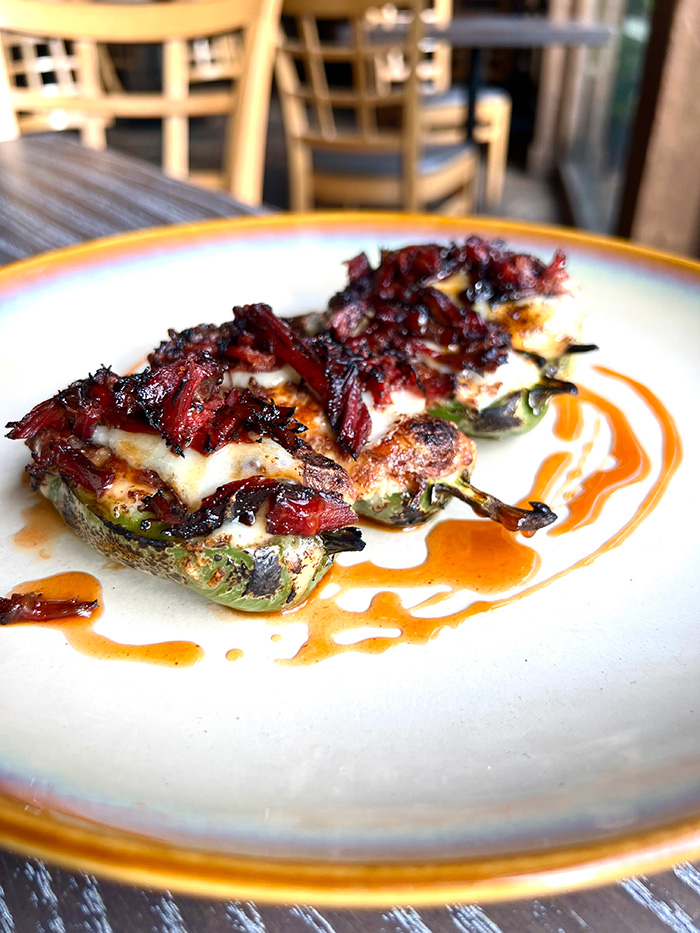
Looking for a new recipe to add a little spice to your next meal? James Beard-nominated chef David Bancroft has just the thing. His brisket stuffed jalapeño poppers recipe (topped with delicious honey hot sauce) is bound to bring a smile to your face—and some warmth to to your belly.

Tips for Your Brisket

Cooking brisket isn’t an easy feat. While you can always cut corners and buy it precooked at your local grocery store, half the fun is learning to do it yourself. When the recipe is all said and done, you’ll be able to take pride in the fact you cooked your own brisket—and enjoy some mouthwatering flavors of your own creation.

  1. Buy the Best Meat
    The first step in making the best brisket is buying the best meat. Experts recommend buying Choice grade or higher. This ensures you’ve got great marbling, which means enough fat to really make something tender and flavorful.
  2. Trim Fat
    Now, trimming fat might seem counter-intuitive when it plays such a crucial role in the taste of your brisket. However, overly-thick fat will keep your brisket from cooking properly. You want to trim back that fat, but leave a thin layer to help trap in the moisture and flavor.
  3. Be Sure to Season
    Don’t skip the seasoning! That’s what brings even more delicious flavors out of your meat. When making brisket for this recipe, you might want to consider a smoky or sweet flavor to complement the heat of the jalapeño.
  4. Decide How You Want to Cook It
    This is probably the hardest decision to make—you have to choose how you want the brisket cooked. If you have the time, you can smoke it to really render those delicious flavors. If not, you can broil it, bake it, or grill it.
Brisket Stuffed Jalapeño Poppers Recipe
Pin
Print

Brisket Stuffed Jalapeño Poppers Recipe

Ingredients

  • Jalapeño-Brisket Poppers
  • 4-5 Jalapeños (large)

  • 4 oz. Shredded pepperjack

  • 4 oz. Cream cheese (soft)

  • 6 oz. Brisket

  • ¼ tsp. Garlic salt

  • Honey-Hot Sauce
  • 3 oz. Local honey

  • 3 oz. Hot sauce of choice

Directions

  • Jalapeño-Brisket Poppers
  • Mix cheeses and garlic salt together until semi smooth.
  • Fold in 4 oz. of shredded brisket but don’t over-mix.
  • Cut jalapeños in half lengthwise and remove seeds. Stuff each half equally with cheese mix.
  • Top each jalapeño with the last 2 oz. of shredded brisket.
  • Bake in oven at 350° F for about 6 to 8 minutes, or until cheese is nice and melted and brisket bits look crispy.
  • Honey-Hot Sauce
  • Stir honey and hot sauce together. Drizzle over the top of the finished poppers to serve.

More Like This:

  • David Bancroft’s Beef Brisket Melt
  • Michael Waddell’s Fried Wild Turkey Nuggets
  • David Bancroft’s Jalapeño Popper Grilled Oyster Recipe

Filed Under: Outdoor Living Tagged With: Backyard Grilling, cook, David Bancroft, Game Day

Joe Thomas’ Cut Out Sugar Cookies

December 2, 2022 by Exmark

This cut out sugar cookie recipe is easy to cut out, holds its shape after baking, and yields soft and chewy sugar cookies.

Cut Out Sugar Cookies
Pin
Print

Cut Out Sugar Cookies

Cookie Ingredients

  • 1 cup salted butter (2 sticks) cold & cut into chunks

  • 1 cup granulated sugar (or vanilla sugar)

  • 1 egg

  • 3/4 tsp pure vanilla extract

  • 1 vanilla bean scraped (optional)

  • 1/2 tsp pure almond extract

  • 3 cups unbleached all-purpose flour

  • 2 tsp baking powder

  • ICING INGREDIENTS
  • 4 cups (480g) confectioners sugar, sifted (I use and recommend Domino brand)

  • 3 tablespoons meringue powder (not plain egg white powder)

  • 9–10 tablespoons room temperature water

  • optional for decorating: gel food coloring

Directions

  • Preheat the oven to 350 degrees.
  • Cream butter and sugar together. Stir in egg, extracts, and vanilla bean. In a small bowl, stir flour and baking powder together. Slowly incorporate dry ingredients.
  • Roll the dough out onto the floured surface to be just over 1/4″ thick. Cut cookies out using cookie cutters and place them onto a parchment paper-lined baking sheet.
  • Freeze for 5-7 minutes, then bake for 10-12 minutes, or until bottoms have lightly browned but edges are still light in color. Cool for 3 minutes on the baking sheet, then remove to cooling racks. Decorate as desired.
  • ICING INSTRUCTIONS
  • Pour confectioners sugar, meringue powder, and 9 tablespoons of water into a large bowl.
  • Using a hand mixer or a stand mixer fitted with a whisk attachment beat icing ingredients together on high speed for 1.5-2 minutes. When lifting the whisk up off the icing, the icing should drizzle down and smooth out within 5-10 seconds.
  • If it’s too thick, beat in more water 1 tablespoon at a time. It may take up to 12-14 tablespoons. Remember that the longer you beat the royal icing, the thicker it becomes. If your royal icing is too thin, just keep beating it to introduce more air, OR you can add more confectioners sugar.
  • When applied to cookies or confections in a thin layer, icing completely dries in about 2 hours at room temperature. If the icing consistency is too thin and runny, it will take longer to dry. If the icing is applied very thickly on cookies, it will also take longer to dry.
  • If you’re layering royal icing onto cookies for specific designs and need it to set quickly, place cookies in the refrigerator to help speed it up.

Notes

  • When you’re not working directly with the royal icing (for example, you are decorating cookies but you still have some icing left in the bowl that you intend to use next), place a damp paper towel directly on the surface of the royal icing. This prevents it from hardening.

Filed Under: Outdoor Living

Brian Latimer’s Sugar Cookies

December 2, 2022 by Exmark

Sugar cookies are a holiday favorite and MLF bass pro, Brian Latimer agrees! Follow along with his tasty recipe to bake some delicious and irresistible holiday cookies.

Brian Latimer’s Sugar Cookies
Pin
Print

Brian Latimer’s Sugar Cookies

Servings

4

servings

Cookies

  • 2 ¾ cups all-purpose flour

  • 1 tsp baking soda

  • ½ tsp baking powder

  • 1 cup butter, softened

  • 1 ½ cups white sugar

  • 1 egg

  • 1 tsp vanilla extract

  • Frosting
  • ½ cup shortening

  • 4 cups confectioners sugar

  • 5 tbsp milk, or more as needed

  • 1 tsp vanilla extract, or more to taste

  • Food coloring (optional)

COokies

  • Preheat the oven to 375 degrees F (190 degrees C).
  • Stir flour, baking soda, and baking powder together in a small bowl.
  • Beat sugar and butter together in a large bowl with an electric mixer until smooth. Beat in egg and vanilla. Gradually blend in flour mixture. Roll dough into walnut-sized balls and place 2 inches apart onto un-greased baking sheets.
  • Bake in the preheated oven until edges are golden, 8 to 10 minutes. Cool on the baking sheets briefly before removing to a wire rack to cool completely.
  • Frosting
  • Beat shortening in a large bowl until creamy. Gradually mix in confectioners’ sugar in small amounts, alternating with 5 tablespoons milk, until smooth. Mix in vanilla and continue to beat until frosting is stiff and glossy, about 5 minutes, adding more milk if needed.
  • Mix in food coloring, separating into smaller bowls if using multiple colors.
  • Spread frosting on cookies or fill piping bags and decorate cookies as desired.

Notes

  • Top these sweet cookies with a sugar cookie frosting to really impress!

Filed Under: Outdoor Living

  • « Go to Previous Page
  • Go to page 1
  • Go to page 2
  • Go to page 3
  • Go to page 4
  • Go to page 5
  • Interim pages omitted …
  • Go to page 12
  • Go to Next Page »

Primary Sidebar

  • Home
  • Mowing
  • Outdoor Living
  • Lawn + Garden
  • Ambassadors
  • Originals
  • Subscribe
  • Facebook
  • x
  • YouTube
  • Instagram
  • Tiktok

Copyright © 2026 EXMARK - Backyard Life

  • Privacy Policy
  • Terms of Use
  • DMCA

Trending