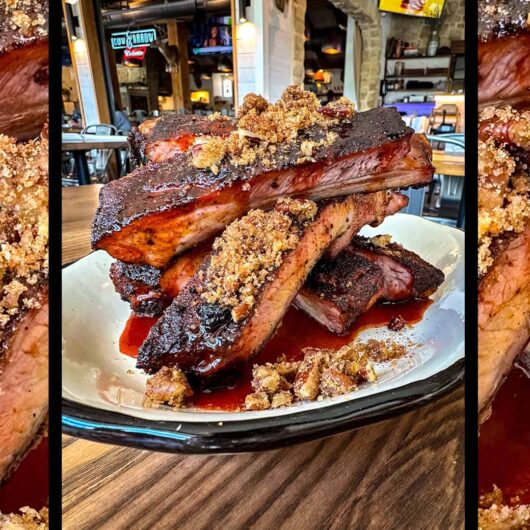
As a James Beard-nominated chef, it’s safe to say that Exmark Ambassador David Bancroft knows a thing or two (or three) about whipping up a mean rack of ribs. In fact, his ribs helped propel him to victory on Food Network’s Iron Chef Showdown in 2018. So, follow along in this Backyard Life article as the champ dishes out his Iron Chef Hot-Honey Ribs, complete with pecan streusel crumble.
Kicking off the Cook
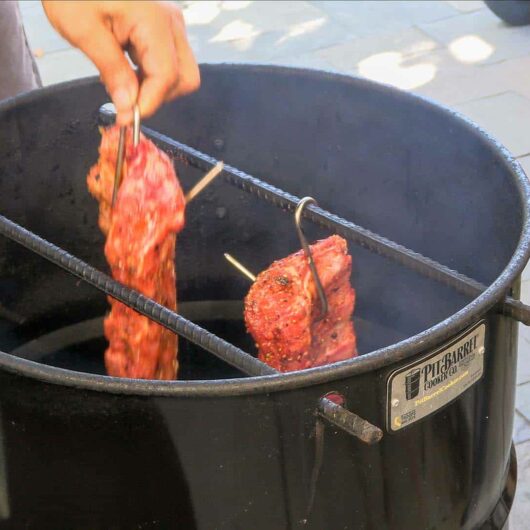
To start this Iron Chef recipe, David preheats his smoker to 225° F, and gets to work on his homemade dry rub. The rub is a simple combination of chili and garlic powder, cumin, thyme, brown sugar, salt, and black pepper. Once he’s combined the spices in a bowl, he generously seasons the ribs and moves them straight to the smoker rack.
For the best results, Bancroft says to leave the ribs on the rack for about two and a half to three hours (or until tender). Then, remove the ribs from the smoker, wrap them in foil, and let them rest for 20 minutes.
Putting the “Hot Honey” in Hot-Honey Ribs
After throwing his ribs on the smoker, David starts on his custom hot-honey sauce. (It wouldn’t be a “hot-honey ribs” recipe without the “hot-honey,” after all!) Even better, this part of the cook really allows you to make it your own. Bancroft says you can use whatever hot sauce suits your fancy. All you have to do is whisk a cup of your favorite hot sauce with a cup of honey! It’s really that simple.
Concocting the Pecan Streusel
When baking up his pecan streusel, Bancroft has a few words of advice. First and foremost, he says not to over-mix the ingredients in the food processor. You want it to be nice, crumbly, and light. Over-mixing it will create an extra crisp and compact mixture that doesn’t have nearly as great a texture or flavor. And, while the streusel is baking in the oven, make sure to stir it every five minutes to keep it from burning. While he recommends a baking time of 20 to 30 minutes, he says you’ll know it’s ready when it has a nice golden-brown finish.
Plating the Hot-Honey Ribs
Once the ribs have been removed from the smoker, glaze whipped up, and streusel baked, it’s nearly time to dig in! But first, David says to slice the racks into individual bones to maximize the coverage of glaze and streusel. Then, simply layer on the glaze, liberally sprinkle on the streusel, and serve immediately. Your friends and family are bound to be left wondering if you’ve won a competition or two with this mouthwatering cook.
Iron Chef Hot-Honey ribs Ingredients
- Iron Chef Ribs
2 racks St. Louis style ribs
- Dry Rub
1 tbsp. Chili powder
1 tbsp. Garlic powder
1 tsp. Cumin
1 tsp. Thyme
2 tsp. Brown sugar
1 tbsp. Salt
1 tsp. Black pepper
- Hot-Honey Sauce
1 cup Hot sauce (your preference)
1 cup Honey
- Pecan Streusel
1½ cups Pecans
1 cup Brown sugar
½ cup Sugar
3 oz. Flour
1 tbsp. Kosher salt
3 oz. Cold butter
Iron Chef Hot-Honey ribs STEps
- Dry Rub and Hot-Honey Sauce
- Combine the dry rub spices in a small bowl and season the ribs generously.
- Then, combine the hot-honey sauce ingredients in a small bowl and whisk until combined. Set it aside.
- Iron Chef Ribs
- Preheat your smoker to 225° F.
- Place seasoned ribs on smoker rack and allow it to cook for two and a half to three hours, or until tender.
- Remove ribs from smoker and wrap in foil. Allow to rest for 20 minutes.
- Pecan Streusel
- Pre-heat oven to 350° F.
- Pulse all ingredients—except butter—in food processor until a crumble forms. (Do not over-mix.)
- Remove the crumble from the processor, pour into a bowl, and mix in the butter by hand.
- Spoon the crumble onto a sheet tray and place in the oven for 20 to 30 minutes, stirring every 5 minutes to ensure the outsides don’t burn.
- Once cooked evenly to a golden brown, remove the streusel from the oven and let it cool at room temperature.
- Plating
- Remove the ribs from the foil and slice into individual bones.
- Glaze the freshly cooked ribs with hot-honey sauce and sprinkle on the streusel liberally. Serve immediately!