Exmark Z Turf Equipment Backyard Life
  • Skip to primary navigation
  • Skip to main content
  • Skip to primary sidebar

Exmark's Backyard Life

Living Happens Outdoors

  • Mowing
  • Outdoor Living
  • Lawn + Garden
  • Ambassadors
  • Originals
  • About Exmark
  • Subscribe to Backyard Life
Search

Butterscotch Pecan Pie on the Grill

November 30, 2020 by Exmark

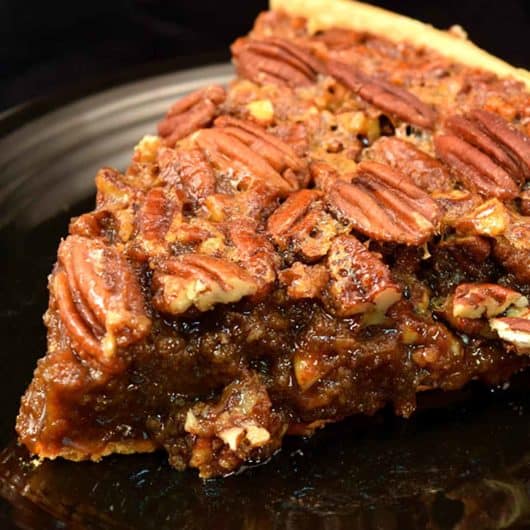
This butterscotch pecan pie on the grill is a delicious twist on the Thanksgiving Day classic. Whether you say PEE-can, pe-KAHN, or PEE-KAHN, you’re going to fall in love with this recipe and how easy it is to make. A pie made with butterscotch chips and an extra whisper of pecan smoke that comes from cooking the pie on the grill with Green Mountain Grill’s Gold Blend pellets. From our friends at Date Night Doins’ comes this irresistible twist on an American staple.

Butterscotch pecan pie on the grill in a cast iron skillet.

History of Pecan Pie

While there’s not a storied history of pecan pie made on the grill, there is a decades-long history of the traditional variation and of the pecan itself. 

You might wonder why pecan pie is a Thanksgiving tradition. That one’s easy to answer. The pecan harvest begins in September and goes through November every year, making its pie the ideal Thanksgiving recipe. The pecan grows most abundantly in the state of Georgia, which explains why the South can’t get enough of the delicious pie, no matter what the variation.

What is Butterscotch?

So, what is butterscotch, exactly? It’s a great question, believe it or not. Lots of folks aren’t quite sure what the difference between butterscotch and its richer, darker cousin, caramel, is. What it really comes down to is how it’s made. 

Caramel is a fussy sauce because of the way it’s made. Traditionally, caramel is made by cooking sugar until it’s melted down. This can easily lead to clumping and burning; enter butterscotch. Butterscotch is made with sugar and butter. The addition of the butter allows the sugar to cook more evenly and smoothly so you can panic a little less. 

Fortunately, this recipe for a delicious butterscotch pecan pie on the grill requires butterscotch chips. So, no need to worry about cooking up your own butterscotch unless you’re really trying to go the extra mile.

Butterscotch Pecan Pie on the Grill
Pin
Print

Butterscotch Pecan Pie on the Grill

Servings

8

servings
Total time

1

hour 

15

minutes

Ingredients

  • 1 Ready made pie crust

  • 1 cup Dark corn syrup

  • 1 cup Real maple syrup

  • 2 1/2 cup Brown sugar

  • 2 tablespoons Vanilla extract

  • 1/4 cup butter, melted

  • 6 eggs, beaten

  • 2 cups chopped pecans

  • 2 cups pecan halves

  • 2 cups butterscotch chips

Directions

  • Mix together all ingredients except for crust and pecan halves.
  • Spray your cast iron skillet with a cooking spray.
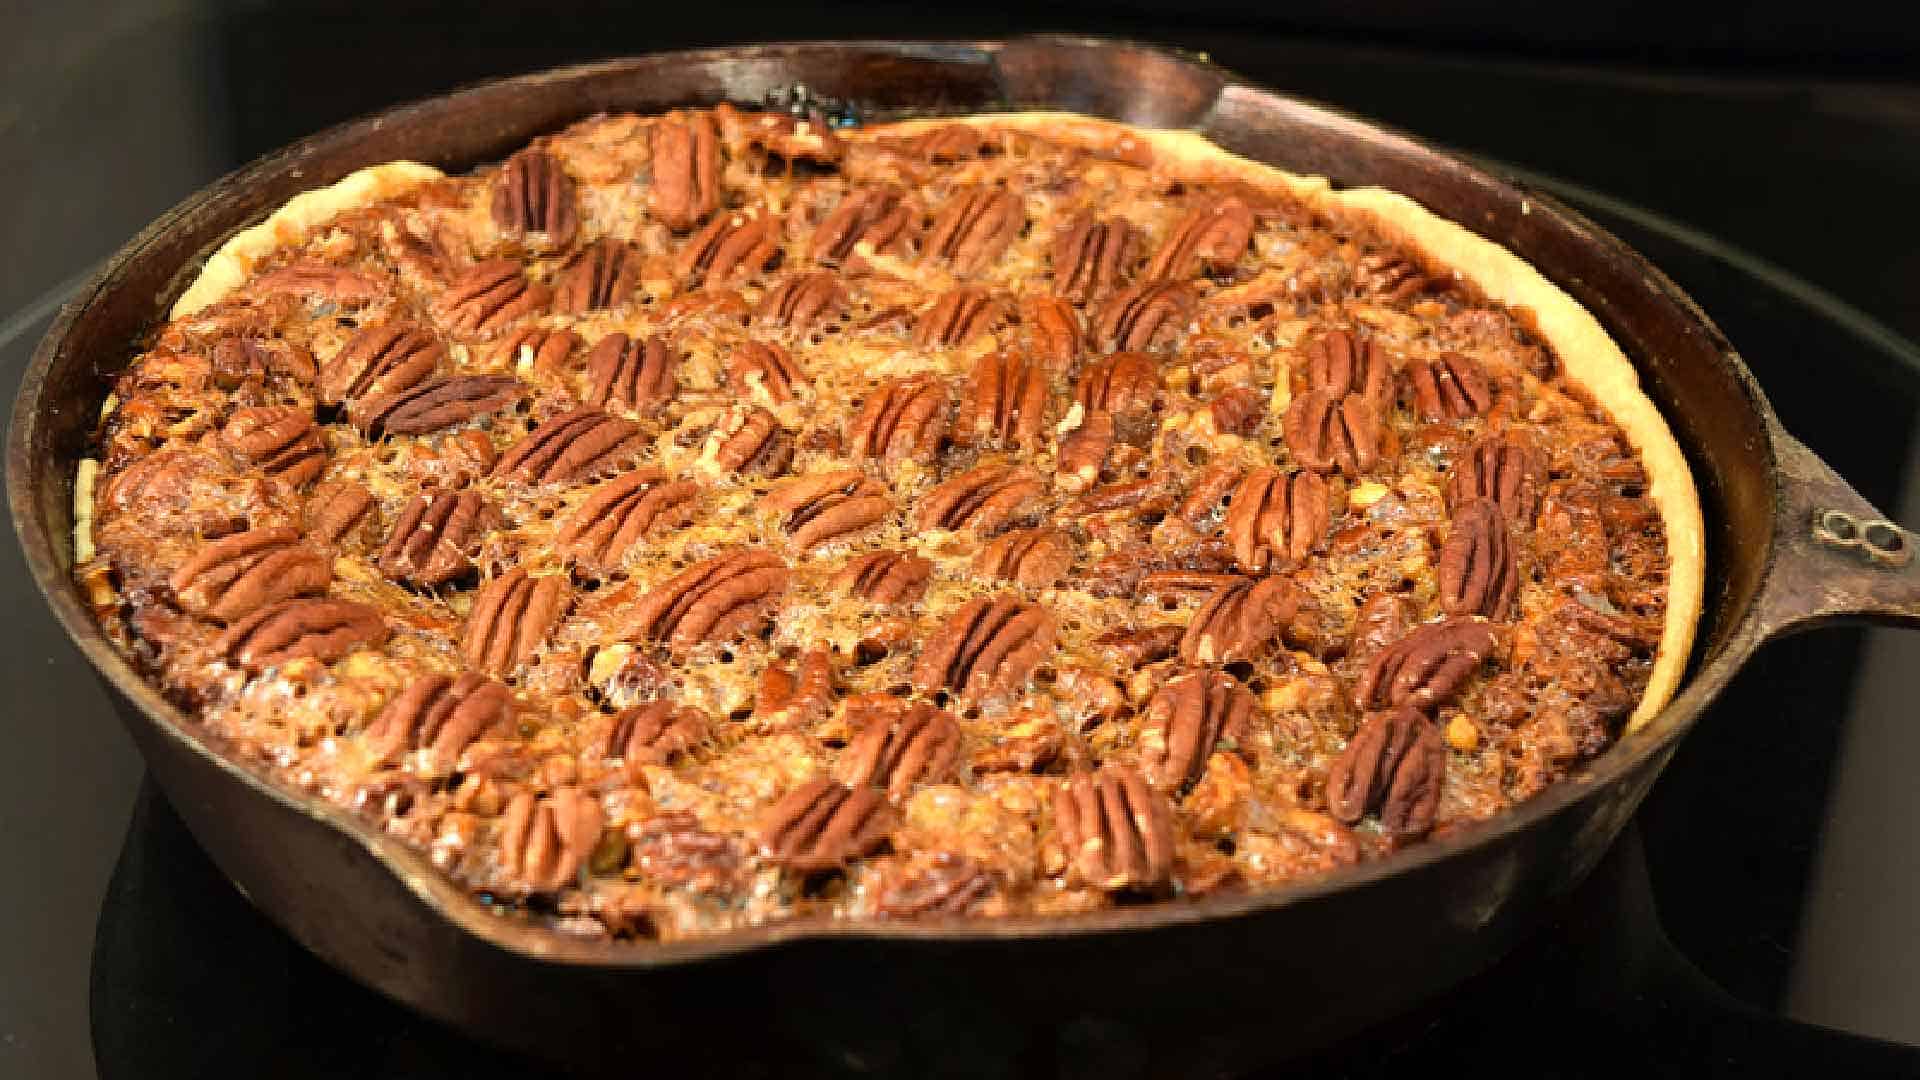
  • Pour filling into pie shell and top with pecan halves.
  • Preheat the grill to 375* (190c) and place your Pecan pie directly onto the grill for about 60 minutes. When the crust is nicely browned pull it off the grill and let it cool. Be careful it is like molten lava and will stick to anything it may be spilled on. Let cool and serve.

There you have it! A delicious, easy, pecan pie on the grill. We recommend pairing this with our Grilled Brazilian Pork Ribs Recipe With Ballistic BBQ for a meal that’s going to bring your friends back to the yard over and over again.

More Sweet Recipes:

  • Chocolate Caramel Cheesecake Recipe With a Twist
  • Joe Thomas’s Grilled Sweet Potato Slices
  • Cherry-Glazed, Pork Belly Slider Recipe

Filed Under: Outdoor Living Tagged With: Backyard Grilling, cook

Cajun Deep-Fried Turkey Nugget Recipe

November 12, 2020 by Joe Thomas

With the holidays fast approaching, you may be wondering how to make the most of your game meat—or, how to make a unique thanksgiving recipe. In this Backyard Life video, Joe Thomas shows us a unique Thanksgiving eat with his deep-fried turkey nugget recipe demo.

“I love turkey hunting in the spring,” says Thomas. But, what he loves just as much is setting aside some of the breast meat for a great meal. He uses it in the fall to make his Thanksgiving specialty: deep-fried wild turkey nuggets. These delicious, bite-sized treats are easy to fry at home, says Thomas. “You can also use grouse, pheasant or even chicken.” But, it all starts with some good boneless, skinless breast meat.

Turkey Nugget Prep Work

Thomas gets started by cutting two large turkey breasts into bite-sized chunks about 1 to 1 ½ inches thick. Then, he makes a marinade of milk and Frank’s hot sauce (and sometimes a little butter). However, if you’re really into heat, Thomas recommends cutting the milk and butter.

Thomas then puts the turkey nuggets into a large freezer bag with the marinade, allowing them to soak up the flavor overnight.

Turkey Frying Tips

Thomas pulls out the marinated nuggets the next day once he’s ready to cook them. But, there’s one more delicious step before these wild turkey nuggets hit the fryer.

Thomas pulls out the nuggets in batches of 6-8. Then, he dredges them in McCormick’s Cajun Seasoning straight out of the box. From there, he checks the temperature of his peanut oil. “You want it to be around 350-375 degrees,” he says.

To test the oil, Thomas uses an old trick from his grandma. “Put a little piece in the oil. If it starts to brown and floats immediately, you know you’re ready to go.”

Thomas then drops his first batch of nuggets into the fryer and watches to make sure they don’t end up under or overdone. His tip: “When that batter turns golden brown and they float up, you know that they’re good.” Then, he scoops them out onto paper towels and readies them for serving.

In all his years making them, there’s only one problem Thomas has encountered with the recipe. “By the time you get a batch out, everybody standing around the grill has already eaten them. And, now you have to start all over again!”

“Give this unique holiday eat a shot” says Thomas, and “I promise everyone who comes over this Thanksgiving will love them.” 

Serve as appetizer or with fries and biscuits as a full entrée. You can try Joe Thomas’s deep-fried Cajun Turkey Nugget recipe at home using directions below:

Cajun Deep fried turkey nuggets
Serve these deep-fried turkey nuggets as an appetizer or with fries and biscuits as a meal.
PrintPrint

Directions

  • Cut boneless, skinless wild turkey breast into approximately 1-inch cubes and soak in a Ziploc bag with Frank’s hot sauce for a minimum of three hours.
  • Take marinated nuggets out of the Ziploc bag and put directly into a clean bowl.
  • In a second bowl place a box of McCormick’s Cajun seasoned batter mix. With a fork, roll marinated turkey chunks in McCormick’s mix.
  • Take turkey chunks out of seasoning and drop 8-12 nuggets into a pan of boiling hot peanut oil (350 degrees). Cook until the meat floats to the surface and remove immediately with a strainer spoon or tongs.
  • Place on a serving dish covered in paper towels to drain excess oil. Repeat process until the entire batch is cooked. 

More Wild Game Recipes:

  • Game Day Grilling Tips From Michael Waddell
  • Andy Morgan’s Grilled Wild-Duck Skewers
  • David Bancroft’s Chicken Fried Quail

Filed Under: Outdoor Living Tagged With: cook, Joe Thomas

Grilled Ribeye and Tater Tots Recipe

August 19, 2020 by Exmark

A behind the scenes look at the food prep behind our Prime Cuts: Grilled Ribeye episode.

Join Prime Cuts chef David Bancroft at the prep table as guest chef Kevin Nashan discusses how he selects, cuts, and pre-seasons his steak, as well as how he concocts and shapes his homemade tater tots. Finally, get the inside scoop on the unique ingredients that go into his “sauce gribiche” (a.k.a. good-old egg salad) and mustard-seed condiments.

Hungry for more? Watch the all the Prime Cuts episodes to see more finished recipes

In the words of grilling expert David Bancroft, “Nothing brings people together quite like food. And, there’s nothing like preparing it in the comfort of your own backyard.”

In this Backyard Life video, we join Bancroft on the set of Prime Cuts. He and guest chef Kevin Nashan are cooking Nashan’s grilled ribeye, cabbage and tater tots recipe. (Yes, that’s right, we said tater tots.)

Getting Ready for Ribeye

David begins by asking Chef Nashan his grilling secrets. And, for him, it’s all about two things: the heat of the grill and the cut of steak. “Keep it simple,” Nashan explains as he seasons his center-cut ribeye with salt and pepper: “Really hot grill. Really good sear. Finish it off in the oven.”

Nashan offers up some other great tips, too. Like referring to coating the grill with grapeseed oil to prevent sticking his “insurance policy.” And, while he’s all about keeping the grill ultra-hot, he also says heat management is key. He likes to keep the back are the hottest. From there you can “get to know your grill,” and place different parts of the meal on the right places for optimum cooking. Almost like cooking with a heath.

“The common trend here with cooking in the backyard is confidence. Get confident with your vessel. Know your hot spots, know your cold spots.” Bancroft explains. And, Nashan agrees.

After they’ve cooked the ribeye for 10-12 minutes to a perfect medium rare, they’re ready to let it rest as they move onto sides, starting with grilled cabbage.

It may sound strange, but Bancroft and Nashan jokingly explain that Napa Cabbage “filets” stand up well to grilling. It’s actually part of the Horseradish family, creating a perfect side for this grilled ribeye recipe.

Grilled ribeye and tater tots recipe
Homemade tater tots (right) take this grilled ribeye to the next level.

Time for the Tater Tots

But, you won’t find Nashan’s coming out of a freezer bag. These scratch-made tots are easy to make with some mashed potatoes and a kick from your favorite chilis. And, they’re easy to fry, too. All it takes is a pot of your favorite oil; just make sure it has a high flash point and a neutral flavor (Nashan likes grapeseed or peanut). Once the oil is at 350, you’re ready to go. Just when it seems this grilled ribeye recipe couldn’t get any better, Nashan takes it to the next level!

He walks Bancroft through caramelizing cippolini onions until they’re sugary sweet, and how to make a savory, fancy egg-salad called “Sauce Gribiche.” There’s also a delicious-looking mustard jus that’s easy to create at home.

Finally, Nashan’s ready to plate. He slices the ribeye steak thin, pulls the homemade tater tots out of the fryer, and layers on all the sides. This dish can only be described as mouthwatering—and perfect for any fall backyard grill out! If you can’t wait to try out this amazing grilled ribeye at home, don’t worry. Here’s the ingredients and outline for the tater tots and sauces, below. 

Prime Cuts Tater Tots, Sauce Gribiche and Mustard Jus

PrintPrint

Tater Tots Ingredients

  • white potatoes

  • salt

  • baking soda

  • chili powder

  • grapeseed oil

PrintPrint

Directions

  • Peel and chop potatoes into one-inch cubes. Separate in half. Boil half the potatoes until soft (but, not falling apart,) then mash.
  • Combine cooked potatoes and raw potatoes in a mixing bowl. Mix in salt, chili powder and baking soda.
  • Roll potatoes into a cylinder in plastic wrap and place in refrigerator until cool. Or, for homestyle tots, use a melon baller to make small balls.
  • 4 Heat grape-seed oil to 350 degrees in an iron skillet and fry sliced or balled tots until golden brown.
PrintPrint

Sauce Gribiche Ingredients

  • tarragon

  • capers (keep the liquid)

  • shallots

  • mayonnaise

  • egg yolks

  • rice wine vinegar

  • salt

PrintPrint

Directions

  • Peel, chop and divide shallots. Cook half in an iron skillet on medium-high heat.
  • Mix remaining ingredients with shallots in a mixing bowl. Serve room temperature.
PrintPrint

Mustard sauce Ingredients

  • mustard seeds

  • pickling liquid from your favorite pickled dish

PrintPrint

Directions

  • Rehydrate mustard seeds by soaking them in water. Drain off and sit aside.
  • Mix seeds with pickling liquid from your favorite pickled food, such as dill pickles or rutabagas, for example. Refrigerate over night. Serve cold.
     

Watch Prime Cuts:

  • Kevin Nashan’s Grilled Ribeye Steak
  • Rob McDaniel’s Seared Venison
  • Kevin Nashan’s Chicken and Brussels Sprouts
  • Rob McDaniel’s Pompano and Pickled Peppers

Want insider access to more prep videos and grilling recipes? Then, start your FREE Backyard Life e-news subscription, today! Simply sign up (below) and we’ll notify you when this—and other bonus content—is waiting in your inbox.

Filed Under: Outdoor Living Tagged With: Backyard Grilling, cook

Pan-Roasted Salmon Recipe from David Bancroft

August 17, 2020 by David Bancroft

Prime Cuts host and top-chef David Bancroft shared this bonus recipe from his Auburn, AL restaurant—Acre. Impress your guests with this pan-roasted salmon recipe that’s simple to prepare, but looks and tastes great. The salmon filet is plated with an arugula salad and corn bisque. The best part is that this crispy salmon recipe is ready in 6 minutes!

Pan-roasted salmon can also be made “backyard style” using a cast iron skillet to sear the salmon filet on your grill. The cast iron gets hot and stays hot, evenly. Turn the heat off for those last couple of minutes of cooking on the other side.

pan seared salmon recipe.

How to Prepare Pan-Roasted Salmon

Total Time: 6 minutes

  • 1 tbsp. canola oil
  • 2 6 oz. salmon filets
  • Salt and pepper

To prepare the salmon filet, season it generously with salt and pepper. Heat skillet to medium high and add oil once hot. Sear salmon two minutes on each side, or until it reaches medium cook temperature. Remove from skillet and allow it to rest for one minute. 

Silver Queen Corn Bisque

PrintPrint

Ingredients

  • 1 stick salted butter

  • 2 ears fresh silver queen corn

  • 1 cup heavy cream

  • 1 cup chicken stock

  • 1/4 tsp. salt

To prepare the bisque, cut corn off the cob then simmer in a medium sauce pot with butter for two minutes on medium heat. Add stock and simmer for five minutes on medium-low heat. Add cream and salt, and bring to slow simmer for one minute. Remove from heat and blend until smooth. 

Summer Garden Salad:

PrintPrint

Ingredients

  • 2 cups loose packed baby arugula

  • 10 cherry tomatoes halved

  • 1/3 shaved jalapeno

  • 1 cup crispy fried okra

  • 1/2 lemon squeezed 

  • 2 tbsp. EVOO

  • A pinch of kosher salt and cracked pepper

Place arugula, tomatoes, and jalapenos into a mixing bowl. Whisk lemon juice, extra virgin olive oil (EVOO), and salt and pepper together to create a light vinaigrette. Pour over salad and fold gently. 

Poblano Ranch Dressing

PrintPrint

Ingredients

  • 1 cup buttermilk

  • 2 charred and peeled poblanos

  • 1.5 cups Duke’s Mayonnaise

  • 2 oz. ranch seasoning packet

Begin by pureeing buttermilk and charred poblanos in a blender until smooth. Then, whisk together mayo and ranch seasoning. Chill before serving.

Plating Your Salmon Recipe

Ladle two to three ounces of bisque into an entre bowl. Place the roasted salmon just off center. Next, place salad so it lightly overlaps the salmon. Garnish with crispy fried okra-like croutons. Drizzle EVOO over the entire dish, and serve poblano ranch on the side.

Filed Under: Outdoor Living Tagged With: cook

Grilled Pompano and Pickled Peppers Recipe

July 14, 2020 by Exmark

As the weather cools, it’s a great time to thaw out those fish caught in the summer and fall, then get them on the grill. In this Backyard Life Video, watch as Prime Cuts host chef David Bancroft and guest chef Rob McDaniel take a deeper dive into the prep for the grilled pompano recipe featured in the Prime Cuts series.

Follow these prep and cooking steps to re-create McDaniel’s awesome grilled pompano recipe featuring pickled peppers and herb breadcrumbs!

Prime Cuts: Griled Pompano

1. Prepare The Breadcrumbs

PrintPrint

BREADING Ingredients

  • Ciabatta bread

  • Stick butter

  • Clove garlic (pressed)

  • Parsley (chopped)

  • Chives (finely sliced)

Breadcrumb Process

  1. Grind ciabatta bread into fine pieces.
  2. Melt butter and mix in pressed garlic. Mix in ground ciabatta pieces until thoroughly coated and bake.
  3. Combine chopped parsley, chives, and toasted breadcrumbs in a mixing bowl. Zest in 1 lemon.
  4. Return to oven and bake until lightly crisp.

2. Prepare the Pickled Peppers

PrintPrint

PIckled Pepper Ingredients

  • 1 quart Pickled peppers

  • 1 Onion

Pickled Pepper Process

  1. Slice onion into thin slices.
  2. Cover with your favorite pickled peppers.
  3. Stir mixture together and warm over medium heat.

3. Prep the Pompano for Grilling

To start, clean and fillet your Pompano. Then, apply a light coat of peanut oil, salt, and pepper to both sides. But, McDaniel cautions against applying too much, as doing so will lead to your fish tasting like burnt oil.

Heat your grill to 600 degrees. (For this dish, McDaniel opts for a Big Green Egg—not a traditional gas or charcoal grill.)

Place your fillets skin-side down on the grill. Don’t overthink things or panic. Let patience take over. Allow the fillets to cook until they’re nice and crispy on one side (essentially, the whole way through on the skin side) to achieve nice grilled char marks. Once the scales and skin are nice and crispy, flip and allow the flesh side to briefly cook. Then, remove the Pompano from the grill and allow it to rest while you prepare the other ingredients for your final plate-up.

Next, ready your pre-toasted breadcrumbs. (McDaniel opts for ones made from ciabatta bread for this recipe.) Jump to Recipe

4. Plate Your Grilled Pompano

Now, it’s time to add your pre-pickled peppers. (McDaniel uses a variety of in-season peppers like aji dulce, Jimmy Nardello and jalapenos. He also adds a little fresh garlic and red onion for this recipe.)

Prepare your final grilled Pompano dish by lining the bottom of your plate with pickled peppers. Then, place a healthy portion of breadcrumbs on top of your Pompano before placing it atop your pickled peppers.

And, there you have it—one heck of a Pompano recipe that’ll knock the chill off any fall night! Settle in for a crisp and cool evening and get ready to enjoy this delicious grilled pompano. And, it’s made all the better with a spicy kick of peppers and a savory, breadcrumb crunch.

More Prime Cuts Episodes:

  • Kevin Nashan’s Grilled Ribeye Steak
  • Rob McDaniel’s Seared Venison
  • Kevin Nashan’s Chicken and Brussels Sprouts

Filed Under: Outdoor Living Tagged With: cook, Grilled Fish

Seared Venison and Sweet Potatoes Recipe

July 14, 2020 by Exmark

If you watched our Prime Cuts seared venison video and can’t get enough, we’ve got you covered with meal prep and cooking steps from guest chef, Rob McDaniel (formerly of SpringHouse). Follow these easy steps to re-create McDaniel’s delicious, seared venison recipe. Then, serve it all up with roasted Brussels sprouts, caramelized sweet potatoes, and an unbeatable pecan vinaigrette. 

Helpful Venison Tips

Before you get into this recipe, there are a few helpful tips you should bear in mind. Venison is a delicious meat and it’s pretty easy to work with, but these helpful hints will make your life just a little easier.

  1. Trim up your venison filet . You don’t want it to be too fatty; an easy mistake to make . 
  2. McDaniel recommends cooking up the veggies in the same skillet as the venison for what he calls “one-stop-shop” cooking.
  3. You should allow your venison to rest on a separate plate before cutting it up and plating it.
  4. You should slice your sweet potatoes, roast them, and then press them into coins before cooking them on the skillet. 
  5. If you want to plate like a pro, place a sweet potato coin and a row of sliced venison in the center of your plate. Then top both with sprouts before drizzling your pecan vinaigrette to finish it off. This ensures they cook quickly and caramelize perfectly, so you get the best bite every time.
  6. If you want to be fancy, follow McDaniel’s tip. He recommends using venison he’s personally harvested. He allows it to hang and age for up to 14 days before processing.

Seared Venison and Sweet Potatoes Recipe
Pin
Print

Seared Venison and Sweet Potatoes Recipe

Servings

4

servings
Total time

0

minutes

Ingredients

  • venison filet

  • oil

  • salt

  • pepper

  • brussel sprouts

  • pre-roasted sweet potatoes

  • Pecan Vinaigrette
  • sherry vinegar

  • olive oil

  • reduced orange juice

  • homemade mustard

  • thyme

  • arbol chile

  • toasted pecans

Directions

  • Venison
  • Place a cast-iron skillet in a cold oven and allow it to pre-heat to 500 degrees
  • Trim your venison filet and coat it with a light layer of oil
  • Season with salt and pepper
  • Place venison in your pre-heated, oiled cast-iron skillet
  • Sear your venison on each side
  • Sear for 8-10 minutes for medium-rare
  • Brussel Sprouts and Sweet Potatoes
  • Quarter cut the sprouts
  • Drizzle with oil
  • Season with salt and pepper
  • Place sprouts and sweet potatoes in the skillet with your venison
  • Remove your venison at 8-10 minutes and allow the vegetables to roast until tender
  • Mix vinaigrette ingredients in a bowl
  • Plate!

Alright, you’ve got your delicious recipe, and you’re ready to go. Get going on this delicious meal, and maybe consider whipping it up at your next backyard event or just for your family on a Friday night. It’s a versatile dish!


Watch Prime Cuts:

  • Kevin Nashan’s Grilled Ribeye Steak
  • Rob McDaniel’s Seared Venison
  • Kevin Nashan’s Chicken and Brussels Sprouts
  • Rob McDaniel’s Pompano and Pickled Peppers

Want insider access to more prep videos and grilling recipes? Then, start your FREE Backyard Life e-news subscription, today! Simply sign up (below) and we’ll notify you when this—and other bonus content—is waiting in your inbox.

Filed Under: Outdoor Living Tagged With: Backyard Grilling, cook, wild game

  • « Go to Previous Page
  • Go to page 1
  • Interim pages omitted …
  • Go to page 7
  • Go to page 8
  • Go to page 9
  • Go to page 10
  • Go to page 11
  • Go to page 12
  • Go to Next Page »

Primary Sidebar

Stay Connected

Keep living your best backyard life all year round. Get alerts on the latest Original Series updates, along with the inspiration and know-how you need to enjoy backyard life to the fullest!

Loading
  • Home
  • Mowing
  • Outdoor Living
  • Lawn + Garden
  • Ambassadors
  • Originals
  • Subscribe
  • Facebook
  • x
  • Instagram
  • YouTube
  • Pinterest

Copyright © 2025 EXMARK - Backyard Life

  • Privacy Policy
  • Terms of Use
  • DMCA

Trending