Exmark Z Turf Equipment Backyard Life
  • Skip to primary navigation
  • Skip to main content
  • Skip to primary sidebar

Exmark's Backyard Life

Living Happens Outdoors

  • Mowing
  • Outdoor Living
  • Lawn + Garden
  • Ambassadors
  • Originals
  • About Exmark
  • Subscribe to Backyard Life
Search

Grilled Brazilian Pork Ribs Recipe With Ballistic BBQ

July 2, 2021 by Greg Mrvich

Ribs are a backyard-BBQ staple meal. Which is why Ballistic BBQ host Greg Mrvich is excited to share his Brazilian pork rib cook—complete with marinade and glaze recipes—in this Backyard Life video.

Prepping the Pork Ribs

Greg kicks the cook-off by creating a marinade that he blends in a food processor.

With his marinade complete, Greg then preps his ribs by removing the outer membrane. When asked why he does this, Greg notes that t allows smoke penetration through both sides of the rib. (If you leave the membrane on, it prevents this from occurring.) He likes the mouthfeel of ribs without a “plasticky” crunch. (That said, Greg says to “do what you like to do.”)

How to Remove the Membrane From Pork Ribs

Greg says removing the membrane (and trimming the excess) is an easy process accomplished with only a butter knife. All you need to do, he says, is slide the butter knife under the top membrane. Then, twist to loosen it up so you can get a finger underneath, and pull it off. Preferably, take ONLY the top membrane off. The bottom’s made of open fibers which help keep the ribs together, so you don’t want to risk removing it. 

If there’s a bone on the end of the rack that’s been saw cut, you’ll want to cut that rib off so you’re left with a nice, clean-cut. Then, trim excess loose ends of membrane or fat to square off the ends of ribs.

Once the ribs are prepped, he places them in 2-gallon Ziploc bags filled with marinade for a minimum of 2 hours. This takes up less fridge space and easier to massage the ribs in. (Greg prefers to marinade his ribs overnight.)

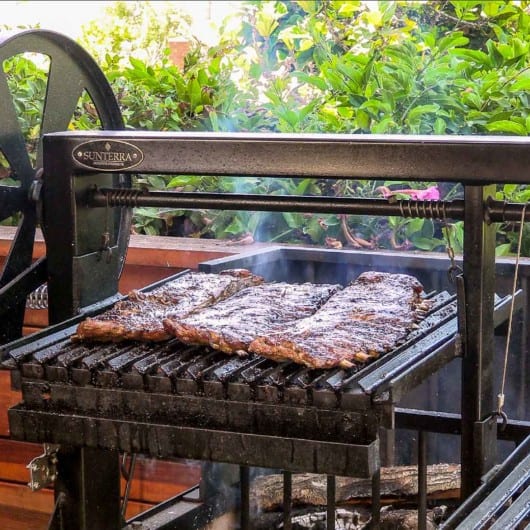
Although ribs can be cooked on a variety of grills (kettle cooker, or pellet, gas or charcoal grill), Greg is opting for an Argentine grill. Namely, because it burns logs and has adjustable racks. He notes that you’ll want to generate coals, while also being mindful of your temperatures. On a kettle cooker, for example, Greg would do indirect heat with the lid on at about 250 degrees Fahrenheit, then finish them over direct heat. 

Regardless of the type of grill you use, Greg says you’ll want to rotate the ribs so they’re evenly cooked. “Cook in the mid-200-degree range for about an hour (flipping often and spritzing with water) to achieve a nice, even cook,” he reiterates. 

Assembling Glaze and Finishing the Cook

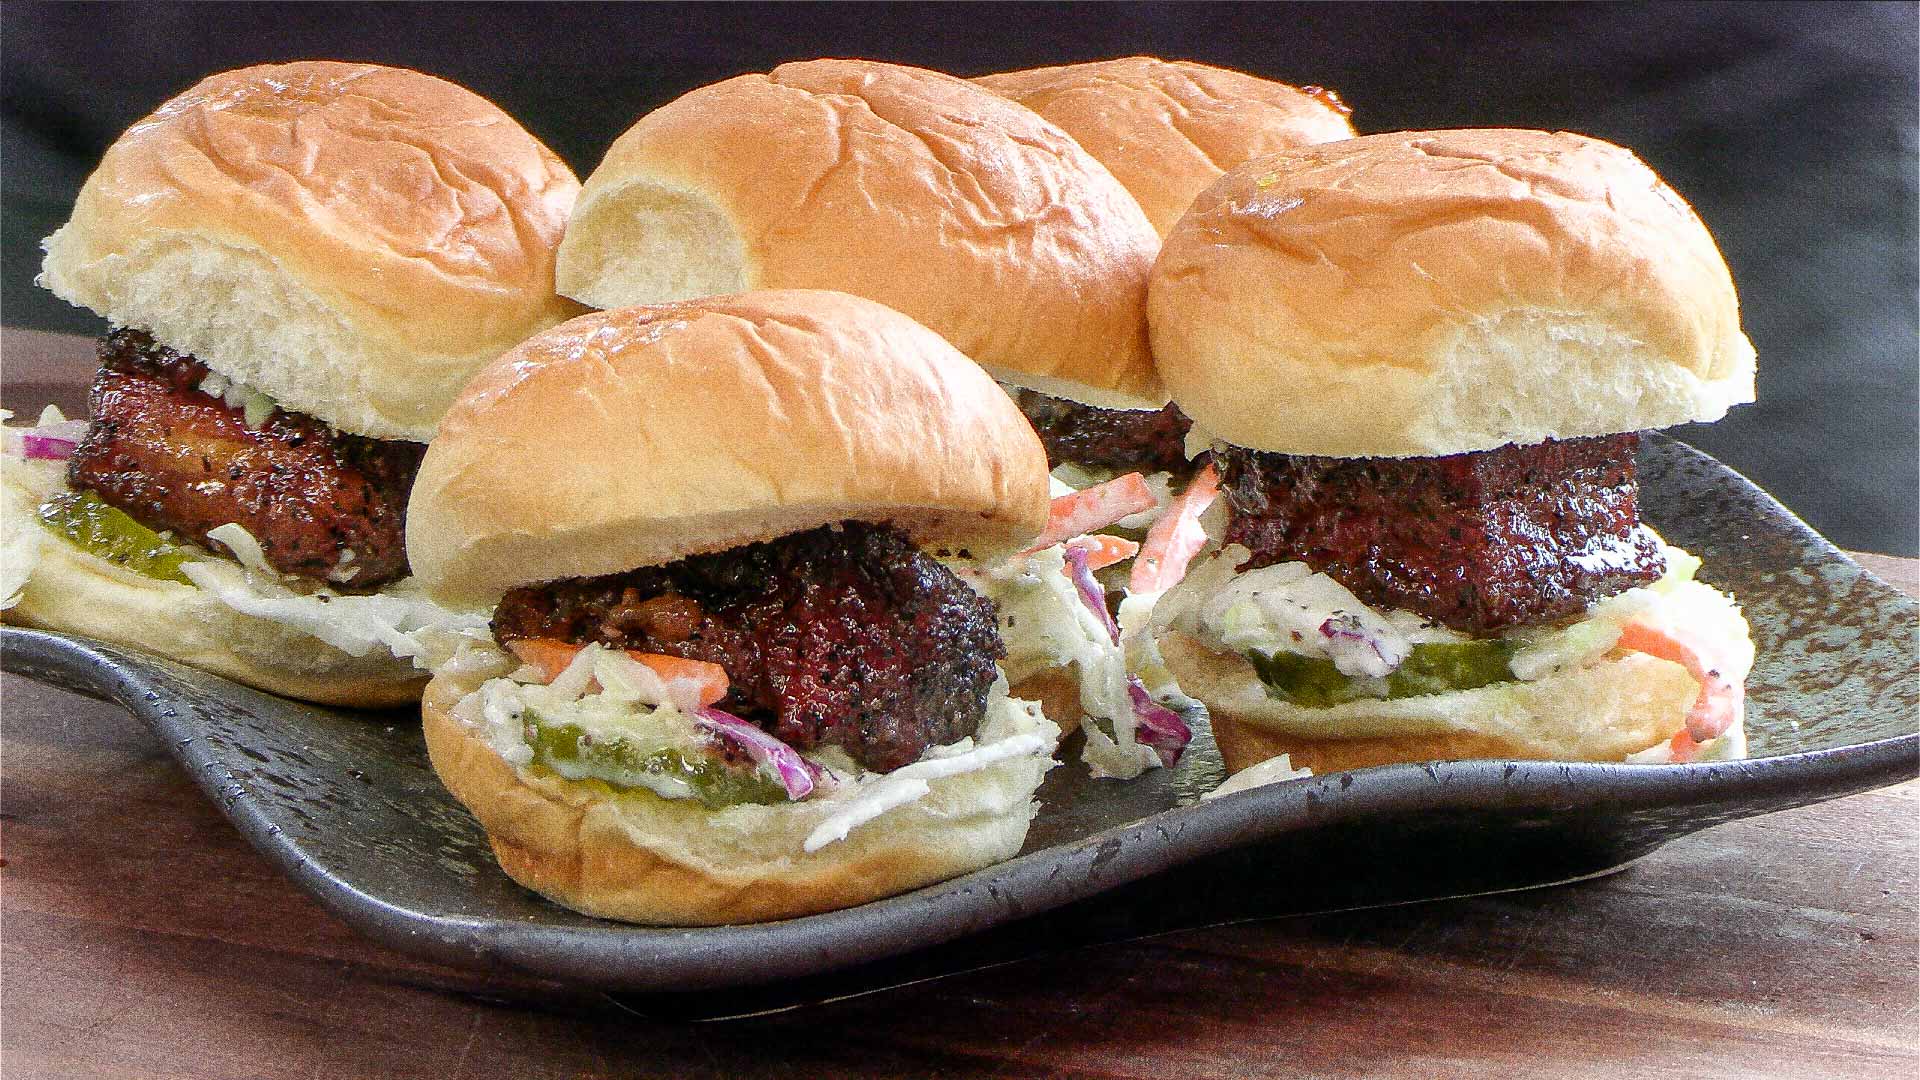
Next, Greg will mix his glaze (his recipe is below), then microwave it for 30 seconds before applying. While the ribs can be cooked to your particular temperature/consistency liking, Greg prefers to grill his for approximately 5 hours (or, until the bones begin falling apart). Going the “low-and-slow” route helps create optimal flavor and tenderness.

Greg notes that your ribs can be cooked to your particular temperature/consistency liking, but that he prefers to grill his for almost 5 hours (or, until bones begin to fall apart). He always goes the “low-and-slow” route to achieve maximum flavor and tenderness!

And, there you have it! All you need to do now is break out the wet wipes!

Grilled Brazilian Pork Ribs Recipe With Ballistic BBQ
Pin
Print

Grilled Brazilian Pork Ribs Recipe With Ballistic BBQ

Brazilian Pork rib Ingredients

  • 3 racks St. Louis pork spare ribs (trimmed)

  • Marinade
  • 7 cloves Garlic

  • 1 chopped Medium white onion

  • ½ cup Apple cider vinegar

  • 1 tbsp. Ginger (fresh)

  • 3 Limes (juiced)

  • 1 Lime (fresh)

  • 2 tsp. Dijon mustard

  • 2 tsp. Worcestershire sauce

  • 1 tsp. Dried oregano

  • ½ tsp. Cumin

  • 1 tsp. Black pepper

  • Honey Glaze
  • 1 cup Honey

  • 2 pinches Dried coriander

  • 2 pinches Chili powder

  • 2 pinches Coarse kosher salt

Brazilian pork rib Directions

  • Add all marinade ingredients into a food processor and blend.
  • All all hone glaze ingredients into a bow and mix together.
  • Place trimmed ribs in a plastic zip-top bag with marinade and refrigerate 2-12 hours.
  • Remove ribs from bag, then remove excess marinade (over sink).
  • Place ribs on preheated grill and cook over low, or indirect, heat until tender (typically takes about 5 to 6 hours).
  • Apply honey glaze to both sides of ribs and continue cooking over low heat until glaze sets.
  • Allow ribs to rest for approximately 15 minutes before slicing.

More Like This:

  • Cherry-Glazed, Pork Belly Slider Recipe
  • Mango, Pineapple, Ginger Glazed Pork Spare Ribs Recipe
  • Stuffed Pork Loin with Cranberry Apple Bacon Jam

Filed Under: Outdoor Living Tagged With: Backyard Grilling, Ballistic BBQ, cook

Cherry-Glazed, Pork Belly Slider Recipe

June 8, 2021 by Greg Mrvich

Sweet savory pork belly sliders with a touch of heat.

Ballistic BBQ host Greg Mrvich’s recipes are known for their complex mix of flavors. And, his cherry glazed pork belly slider recipe featured in this Backyard Life video follows suit. It’s a sweet, savory dish that dishes out a little bit of heat.

Greg begins by dicing an eight-pound skinless pork belly into the two-inch squares needed to fit inside his Hawaiian sweet rolls. Once cut, Greg places them on a rack before cooking them, later.

Next, Greg creates a homemade rub made of black pepper, white sugar, brown sugar, kosher salt, onion powder, garlic powder, mustard powder, chili powder, ground allspice, paprika and celery seed. Greg combines these ingredients into a shaker and applies them liberally to the pork belly slider.

Once his pork belly’s been seasoned, onto Greg’s pellet grill they go. Greg’s using black-cherry wood pellets, and will cook his pork at 250 to 260 degrees for approximately three hours.

Wild-Cherry Glaze

While the pork’s cooking, Greg begins creating his wild-cherry glaze. It consists of a pickling blend—Karo corn syrup, mustard seed, coriander, crushed red pepper, black pepper and whole bay leaves, and a cup of water that are boiled down and left to sit overnight—along with wild-cherry preserves, pork lard and, finally, cayenne pepper. The latter three ingredients create his dish’s signature sweet, salty and savory flavor profile.

Before applying his glaze, Greg concocts a bed of acidic coleslaw that’ll rest atop his pork belly, and offset its sweet glaze. To create it, Greg adds a mixture of apple cider vinegar and fresh lemon juice to a 14-ounce bag of pre-shredded coleslaw, then refrigerate it for a few hours to allow the juices to settle in. (Greg suggests making the slaw ahead of time.)

Greg’s rubbed pork belly’s been smoking for three hours, so now it’s time for him to apply his wild-cherry glaze. Before doing so, however, he’ll finalize it with a few ingredients: Brown sugar, agave nectar, a few dabs of butter and dehydrated, chopped onion. 

Finally, Greg coats his pork with the cherry glaze, then transfers it into a new pan that’s placed back on the grill for a few more minutes of cook time. When the meat’s done, he lets it rest in the pan a bit before plating it. 

Now, it’s time to finish off his sliders. He adds coleslaw and a pickle atop his pork, then tops things off with his Hawaiian bun. 

Let’s get high on the hog, y’all!

Pork Belly Burnt Ends (Sliders)
Pin
Print

Pork Belly Burnt Ends (Sliders)

Cuisine: AmericanDifficulty: moderate
Servings

12

servings
Total time

6

hours 

Want to cook like BBQ master Greg Mrvich? Then, follow his pork belly sliders recipe to create a dish your backyard guests will go hog wild over!

Ingredients

  • 1 skinless pork belly, 8-9 pounds, cubed into 2” squares

  • Dry Rub – Mix ingredients together in a bowl
  • 1/4 cup course ground black pepper

  • 2 tbsps. brown sugar

  • 2 tbsps. white sugar

  • 1 1/2 tsps. kosher or sea salt

  • 2 tsps. onion powder

  • 2 tsps. garlic powder

  • 2 tsps. mustard powder

  • 2 tsps. chili powder

  • 1 tsp. ground allspice

  • 1 tsp. paprika

  • BBQ Glaze
  • 16 bottle bottle of Karo syrup

  • 1 cup water

  • 1 tbsp. pickling spice

  • 1 pinch cayenne pepper

  • Coleslaw Dressing
  • 1/2 cup Mayonnaise

  • 2 tbsp fresh lemon juice

  • 1 tbsp apple cider vinegar

  • 1/2 tsbsp celery seed

  • 1/2 tbsp ground black pepper

Directions: BBQ Glaze

  • Place water and pickling spice in a pan and bring to a bowl. Simmer until about 1/2 cup of the water is boiled out. Set aside.
  • Add 16-ounce bottle of Karo syrup to pan over medium heat.
  • Add pickling spice, water mixture.
  • Add one pinch of cayenne pepper and bring to a boil.
  • Reduce heat and simmer until sauce thickens.
  • Set aside and allow to cool prior to using.
  • COOKING INSTRUCTIONS FOR PORK BELLY BURNT ENDS
  • Preheat smoker or grill to 250ºF – 260ºF.
  • Apply a liberal coating of dry rub to pork cubes (on cooking rack).
  • Place pork in smoker and cook for 3 hours.
  • After 3 hours has passed, remove pork from smoker and place in an aluminum cooking pan.
  • Sprinkle on brown sugar (about ¼ cup), drizzle with agave nectar (or honey), then apply about 2 tablespoons of butter to the top of the pork.
  • Seal pan tightly with aluminum foil and place back in cooker for 1 ½ hours (until tender).
  • After the 1 ½ hours has passed, remove pork from cooker and transfer into fresh aluminum pan.
  • Drizzle about ½ cup of glaze over the pork, and toss with your hands or tongs to coat.  Return to cooker for 5-10 minutes to “set” the glaze.
  • After the five minutes has passed, remove pork from cooker and allow it to rest for about 15 minutes before serving.
  • DIRECTIONS FOR COLESLAW
  • Mix dressing ingredients in a small bowl.
  • Toss dressing with a 14-ounce bag of pre-shredded coleslaw.
  • Refrigerate slaw for a few hours.

Recipe Video

Notes

  • Build sliders by adding 1-2 slices of pickle to the bottom bun. (Greg used Hawaiian sweet rolls). Add dressed coleslaw on top of the pickle. Place one cube of pork on top of the slaw. Crown with the top bun and enjoy.

More Like This:

  • Game Day Party Sliders
  • Mango, Pineapple, Ginger Glazed Pork Spare Ribs Recipe
  • Stuffed Pork Loin with Cranberry Apple Bacon Jam

Filed Under: Outdoor Living Tagged With: Backyard Grilling, Ballistic BBQ, cook

White Bass Taco Recipe

May 21, 2021 by Daniel Arms

Delicious white bass fish tacos being prepared on the grill.

Daniel Arms, veteran homesteader, shares his white bass fish taco recipe. The fresh bass is from the bountiful spring catch over at Arms Family Homestead. If you’re in a pinch, white bass from the store works just as well. This recipe is so simple and can be made with your favorite fish filet if you don’t like white bass. Daniel cooks his fish outside in a wok, but it can also be cooked on the stovetop. Cooking outside allows you to avoid the smoke that often gathers when cooking with oil on high heat. The mesquite BBQ rub Daniel uses, coupled with the mango peach salsa is a flavor combination you’re going to go bananas for!

Behind the Fish

The fish taco originates from Baja, California. Baja is an interesting mix of all sorts of cultures and cuisines. Colonized by the Spanish, much of the cuisine of Baja takes inspiration from the spices and tastes of Spain. When the Spanish left Baja, the Asian and European traders used the area. Because of all these influences, and the pre-existing Mexican influence, the fish taco came into existence. Fish tacos are wildly popular on the West coast, but they can be enjoyed in all sorts of climes. Even in the chilly northeastern states!

If you’re gearing up for a backyard bash, gameday grouping, or just a taco Tuesday, this white bass taco recipe is going to satisfy everyone’s taco and fish cravings in one fell swoop. It’s not overly complicated, so you won’t spend tons of time prepping and cooking, which means more time to enjoy your backyard with friends and family! We recommend pairing it with this delicious Guacamole with a Twist: Broccomoli for an unbeatable taste combo.

White Bass Tacos
Pin
Print

White Bass Tacos

Servings

4

servings
Total time

15

minutes

This is a very simple fish taco recipe that can be made with just about any fish filet.

Ingredients

  • Fresh white bass filets

  • Corn tortillas

  • Blackening seasoning or favorite cajun style seasoning (he used Everglades cactus dust

  • Sweet heat mango peach salsa

  • Fresh cilantro

Directions

  • Heat cast iron skillet or work to a high heat with just a little bit of olive oil.
  • Coat the filets heavily in seasoning and cook 2-3 minutes per side.
  • Filets will turn white and start to flake apart when they are fully cooked.
  • Heat tortillas in the microwave or for even more flavor fry them for about 1 minute.
  • Place the filet on the warmed tortillas
  • Add the sweet heat mango peach salsa and fresh cilantro

Armed with this recipe, head out to cook up your own delicious batch of this white bass taco recipe. And be sure to share with loved ones. Or don’t. It’s okay to be selfish when it comes to good food like this.

More Like This

  • How to Catch, Clean, and Cook White Bass
  • The Best Grilled Mahi Mahi Fish Tacos
  • Grilled Pompano and Pickled Peppers Recipe

Filed Under: Outdoor Living Tagged With: Backyard Grilling, cook, Grilled Fish

Delicious Italian Burger Recipe

April 5, 2021 by Greg Mrvich

Italian Cheeseburger Recipe
Cheeseburger Italiano!

Ballistic BBQ host Greg Mrvich has been known to grill up many a delicious burger, but even he thinks his Italian version is something special. Watch him assemble this Italian Burger recipe . . . and don’t be surprised if you end up blurting out, “Sì grazie!”

Greg’s love of Italian food inspires his cheeseburger Italiano. Simple dishes like pizza Margherita, caprese salad, and mozzarella with basil leaves are familiar tastes he’s looking to incorporate into this recipe.

Greg begins by pressing three ounces of Italian sausage down onto his griddle with a five- millimeter smasher. Sausage alongside a hamburger, you ask? You bet. That’s only the first wrinkle in what makes this Italiano a “working-class special.” Next, he places four ounces of 80/20 ground beef on the grill. For extra flavor, Greg flattens and partially cooks them in sausage fat. (While using mild sausage is fine, don’t be afraid to go with a spicier variety for little more kick.)

Greg runs his griddle at medium-high heat (around 400 degrees), keeping his two main burners on. He also runs his third burner on low (around 200 degrees), and fourth burner completely off.

Greg also melts shaved parmesan cheese on a square of parchment paper. The cheese will form a crisp, adding a nice, crunchy texture, and a bit of what he calls that parmesan “funk” to the burger. 

Greg’s decided to serve his burger on a Crustini bun that he anointed in sausage fat before gently toasting it over indirect heat.

Additional ingredients like mozzarella cheese, paper-thin-sliced cherry tomatoes, and extra virgin olive oil with a balsamic reduction put the finishing Italiano touches on this burger. Oh, and don’t forget the fresh basil leaves!

The Finishing Touches

Most markets carry balsamic reduction, or “glaze.” But, if you’d like to make it, the process is very easy.

Bring 2 cups of a high-quality balsamic vinegar to a gentle boil, then reduce heat to medium-low heat and let simmer, stirring occasionally until the vinegar thickens and is reduced to about 1/2 cup (about 20 minutes). It should be thick enough to coat the back of a spoon.

Remove from heat and allow to cool completely (about 15 minutes).

Buon appetito!

Delicious Italian Burger Recipe
Pin
Print

Delicious Italian Burger Recipe

Cuisine: American, ItalianDifficulty: Easy
Servings

1

servings
Total time

1

hour 

This burger recipe was inspired by my love of simple, “Classic Italian” food. I didn’t want to go the obvious route of slapping on some pizza sauce with some cheese and calling it “good.”  I wanted to make a burger that native Italians would love!
 
The following are one-burger portions, so simply multiply to make more.

Ingredients

  • 1 3 oz. Italian sausage patty

  • 1 4 oz. beef patty (80% lean, 20% fat blend suggested)

  • 1 tbsp. shaved parmesan cheese

  • 2 ozs. mozzarella cheese

  • 4 cherry tomatoes (sliced paper-thin)

  • 6 fresh basil leaves

  • 1/4 tsp. extra virgin olive oil

  • 1/2 tsp. balsamic vinegar reduction (instructions below)

  • salt and pepper to taste

Directions

  • Prep all ingredients in advance.
  • Preheat griddle to medium-high (400 – 425 degrees).
  • Place Italian sausage ball on griddle top, cover with a small square of parchment paper, and smash with spatula or “burger smasher.” Hold pressure for 10 seconds.
  • Place a small square of parchment paper on the griddle surface and spread parmesan cheese in a circular shape. An “egg-ring” makes this easy. Cover cheese with a “burger dome” or stainless steel bowl.

  • Flip sausage after about three minutes and cook an additional three minutes.
  • Place the ground-beef ball on the griddle, topped with a parchment square, and smash with a spatula or burger smasher. Hold pressure for 10 seconds. Season with salt and pepper, and top with mozzarella cheese. Dome the patty (optional, but helps speed up the process).

  • While the burger is cooking, toast Crustini buns on the griddle top.

  • Check parmesan cheese. Once it’s bubbling, remove it from the heat and allow it to cool so the cheese becomes very crisp.

  • When the top of your burger patty starts looking moist, it is ready to flip.
  • Remove toasted buns from the griddle.
  • Place sausage patty on the heal section of the bun.
  • Place parmesan crisp on top of sausage.
  • Place burger patty, with melted cheese, on top of crisp.
  • Top the burger with a layer of very thinly sliced cherry tomatoes. (I used a “mandolin” to slice mine.).

  • Top the tomatoes with 6 fresh basil leaves.
  • Drizzle on a little olive oil.
  • Drizzle on a little balsamic reduction.
  • Crown with the top bun.
  • Enjoy!

Recipe Video

Filed Under: Outdoor Living Tagged With: Backyard Grilling, Ballistic BBQ, cook

Greg Mrvich’s Grilled Jamaican Jerk Chicken Recipe

April 2, 2021 by Greg Mrvich

The star of Greg Mrvich’s latest cook video is his grilled Jamaican jerk chicken recipe. See what goes into his jerk chicken rub and jerk sauce, below, and watch as the Ballistic BBQ host reveals the tips and techniques used. It’s a mouthwatering tropical treat!

Jerk Chicken Prep Tools

Besides the ingredients, you’ll need a tool to butterfly your chicken. Rather than buying expensive poultry shears, Greg recommends picking up a pair of cutters at your local home improvement store. They do a fantastic job of clipping through the chicken, including the skin, so you can get through the process of butterflying your bird that much quicker.

Grilled Jerk Chicken Base

Once butterflied (also known as spatchcocked) to provide a flatter surface for his jerk chicken rub to be applied, Greg begins preparing his rub base. To do so, he uses a food processor to more easily crush the ingredients into a paste he’ll then apply. Because Greg’s Jamaican jerk chicken will need to marinate at least two hours, he suggests setting a time for both preparing the ingredients and spatchcocking the chicken.

Grilling Jamaican Jerk Chicken

Greg’s using a kettle grill with lump charcoal, and recommends indirect cooking at 300 degrees. He only lights part of the grill, and opens his top and bottom dampers to regulate the lower temperature.

Do as the Jamaicans do

To prepare this dish like the natives do, you’ll have to grill it over pimento—commonly called  “allspice”—wood. While you can order pimento wood online, it’s more readily available in the United States as whole dried pimento berries. You can buy it in glass jars for around $7.00, or for around $.99 in pouch form in the international foods aisle at your local grocery.

Greg sprinkles a handful of these whole dried pimento berries in between his grill grates, and onto the hot charcoals, below.

Another pro tip Greg offers when charcoal grilling is to ensure the upper vent is directly over the meat. With indirect grilling, it’s not a bad idea to use a remote temperature monitor. Because the charcoal grill lid thermometer is located on the hotter part of the grill, you’ll get a more accurate idea of the chicken’s internal temperature by using the remote thermometer.

Greg’s target temperatures are 175 degrees in the thigh and 165 in the breast.

Greg cooks the bird for about an hour, after which he turns it 180 degrees to get a little more color on the side not facing the heat. When it’s done, he takes it off the grill and lets it rest a few minutes, then cuts it up and plates it!

Greg Mrvich’s Grilled Jamaican Jerk Chicken Recipe
Pin
Print

Greg Mrvich’s Grilled Jamaican Jerk Chicken Recipe

Servings

4

servings
Total time

1

hour 

30

minutes

Greg Mrvich shares his tasty, grilled Jamaican jerk chicken recipe. He begins this step-by-step video with an authentic jerk rub, and ends with an authentic jerk sauce.

JERK RUB Ingredients

  • 3 1/2 – 4 lb. chicken

  • 1/2 cup packed brown sugar

  • 1 tbsp. ground thyme

  • 1-2 bunches green onion

  • 1 or 2 habanero peppers

  • 2 tsp. ground allspice

  • 1 tsp. ground cinnamon

  • 1/2 tsp. ground nutmeg

  • 2 tbsp. soy sauce

  • 1/2 tsp. minced ginger

  • 6 -8 cloves garlic

  • 1 tsp. kosher (or sea) salt

  • fresh-ground pepper to taste

  • JERK SAUCE INGREDIENTS
  • 2 tbsp. jerk base

  • 2/3 cup pineapple juice

  • 3/4 cup ketchup

  • 6 ozs. beer (lager)

JERK RUB COOKING Directions

  • Combine the above-listed ingredients in a blender or food processor and mix until smooth.
  • Use to marinate chicken for at least 2 hours—but, preferably overnight—before cooking on the grill.
  • Set-up grill for indirect cooking at 300ºF.
  • Cook chicken until the internal temperature reaches 165ºF in the breasts and 175ºF in the thighs.
  • JERK SAUCE COOKING DIRECTIONS
  • Combine all ingredients listed for the Jerk sauce in a pan over low heat and allow to simmer for 30 minutes to an hour, stirring often.  Add more juice or beer to thin the sauce.  
  • Pour sauce over cooked jerk chicken at serving time. 

Recipe Video

Filed Under: Outdoor Living Tagged With: Backyard Grilling, Ballistic BBQ, cook

Jalapeño-Bacon Jam Recipe

March 1, 2021 by Exmark

Who doesn’t love bacon? Bacon is a delicious and great way to pack a little more protein into your favorite dishes. You can crumble it, use the full slices, or even branch out and use this delicious jalapeño-bacon jam recipe to elevate your dishes. 

This dish from Ken Fisher over at Date Night Doins’ is another sensation you’ve got to try! It’s perfect for a charcuterie board or to top off a burger. Your guests are going to love this when you serve it at your next backyard event.

History of Jam

Believe it or not, jam-making is ancient. Well, maybe not jam itself, but the idea of preserving foods using honey or sugar is super old. In Ancient Greece, preserving foods in honey was a common practice – not quite a jam, but close! 

The very first jam recipe, probably, dates to the fourth century AD. That’s pretty old, but it still holds up to this day. You can’t beat a delicious and sweet jam. Unless you create something like a jalapeño-bacon jam recipe that adds some spice and some savory into your sweetness for the ultimate combo. 

How Should You Use Jalapeño-Bacon Jam?

So, now that you’re interested in bacon jam, you’re probably wondering just what to DO with that jam. We’ll tell you!

Probably the best way to use your jalapeño-bacon jam recipe is by slathering it on a burger bun. It’s smoky, spicy, and sweet, so you get just the right kick from your already amazing burger. Try out our Backyard Bacon Cheeseburger Recipe by Ballistic BBQ and add this bacon jam on top. 

Another great way to use this delicious jam is by adding it onto a BLT. A great way to do that is by skipping the traditional strips of bacon and instead spread this jam on your slices of bread. You could even grill it to get something even smokier and more satisfying.

Finally, and probably most surprisingly, you can use it as an amazing salad dressing. It’s not too thick, so you can coat your salad meat with it and then toss it in your salad. It makes a terrific pairing that you’ll want to go back to time and time again.

Jalapeño-Bacon Jam Recipe
Pin
Print

Jalapeño-Bacon Jam Recipe

Servings

2-4

servings
Total time

40

minutes

Everything is better with bacon!

Ingredients

  • 1 lb. bacon (cut into 1″ pieces)

  • 1 large, sweet onion (rough chopped)

  • 7 can Jalapeños

  • 1 large apple (rough chopped)

  • 1/2 cup cup brown sugar

  • 1/4 cup maple syrup

  • 1/3 cup cup apple cider vinegar

  • 2 tbsp.  smoked minced garlic, (see recipe) or garlic (to taste)

  • 2 tbsp. butcher’s grind black pepper

COOKING Directions

  • Cut up your bacon, apple and onion, and set aside.
  • Place the bacon into a skillet and cook until crispy. Use a slotted spoon and place the bacon onto a paper towel, reserving about a tablespoon of bacon fat in the pan.
  • Add onions and apples to your skillet and sauté in the bacon drippings, stirring often until they start to caramelize. (10-15 minutes)
  • Stir in your garlic, jalapeños, black pepper, brown sugar, maple syrup, vinegar and cooked bacon.
  • Stirring often, continue cooking until the liquid reduces, and it thickens to your taste.   (10 – 15 minutes)
  • Remove from heat, let cool and grab a spoon!

Notes

  • I did a rough chop on the bacon, onion, and apple because I want big chunks to spoon on to my burger I was making this for. You can cut these finer to spread, if you like.

Now, you’re armed with an unbeatable jalapeño-bacon jam recipe and can go off and make your very best burgers, salads, and charcuterie boards. Invite folks over to your beautifully mown backyard to enjoy this awesome addition to your regular backyard fare.

More Like This:

  • Delicious Italian Burger Recipe
  • Ballistic BBQ’s June Bug Burger
  • Canning and Preserving 101

Filed Under: Outdoor Living Tagged With: cook

  • « Go to Previous Page
  • Go to page 1
  • Interim pages omitted …
  • Go to page 5
  • Go to page 6
  • Go to page 7
  • Go to page 8
  • Go to page 9
  • Interim pages omitted …
  • Go to page 12
  • Go to Next Page »

Primary Sidebar

Stay Connected

Keep living your best backyard life all year round. Get alerts on the latest Original Series updates, along with the inspiration and know-how you need to enjoy backyard life to the fullest!

Loading
  • Home
  • Mowing
  • Outdoor Living
  • Lawn + Garden
  • Ambassadors
  • Originals
  • Subscribe
  • Facebook
  • x
  • Instagram
  • YouTube
  • Pinterest

Copyright © 2025 EXMARK - Backyard Life

  • Privacy Policy
  • Terms of Use
  • DMCA

Trending