Exmark Z Turf Equipment Backyard Life
  • Skip to primary navigation
  • Skip to main content
  • Skip to primary sidebar

Exmark's Backyard Life

Living Happens Outdoors

  • Mowing
  • Outdoor Living
  • Lawn + Garden
  • Ambassadors
  • Originals
  • About Exmark
  • Subscribe to Backyard Life
Search

Greg Mrvich’s Spiced Sugar Cookies

December 2, 2022 by Exmark

Be the envy of the holiday party with this recipe for spiced sugar cookies from Exmark Ambassador Greg Mrvich. Get your ingredients ready and get baking.

Spiced Sugar Cookies
Pin
Print

Spiced Sugar Cookies

Ingredients

  • 1¾ cups all-purpose flour

  • ½ teaspoon salt

  • ½ teaspoon baking powder

  • 1 ½ teaspoons ground ginger

  • ½ teaspoon pumpkin pie spice

  • ½ cup unsalted butter

  • ½ cup + 1 tablespoon granulated sugar

  • 1 large egg

  • 1 teaspoon vanilla extract

Directions

  • Combine the flour, salt, baking powder, ground ginger and pumpkin pie spice. Whisk until incorporated, and set aside. In another bowl, cream together the butter and sugar until well combined. Next, add in the eggs and vanilla extract.
  • Gradually add in the flour mixture, switching to silicone spatula. The mixture will be thick and sticky. Scoop the cookie dough onto a piece of plastic wrap, covering it well. Shape the dough into a small disk and chill for at least two hours in the refrigerator.
  • Preheat oven to 350ºF and line your baking sheet with parchment paper. Allow chilled dough to soften a bit for about 10 minutes at room temperature.
  • Dust your work surface with flour and roll dough a about ¼” thickness. Using cookie cutters, cut the dough as you like.
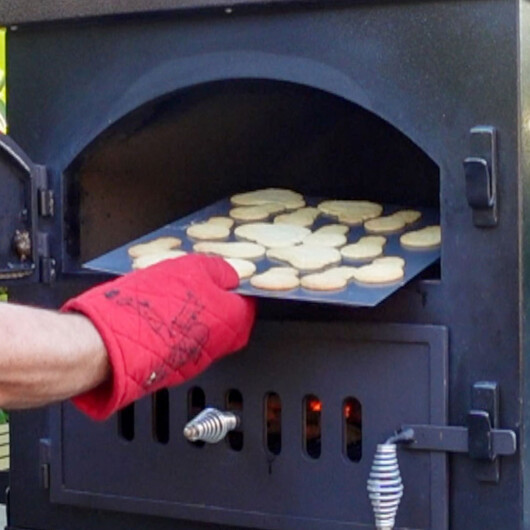
  • Place the freshly cut cookies onto the parchment-lined baking sheet and bake the cookies for 11-13 minutes, or until the edges are a light golden brown. Let the cookies cool for several minutes on the tray, then transfer them to a wire rack and let them cool completely before icing.

Filed Under: Outdoor Living Tagged With: Ballistic BBQ, cook

Grilled Redfish on the Half Shell

November 7, 2022 by David Bancroft

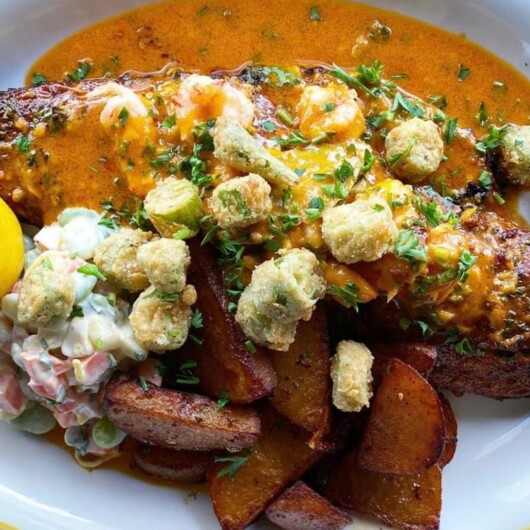
The redfish is one of Florida’s favorite sport fish and an incredibly abundant one at that. It might sound like an exotic fish to the uninitiated, but the taste is mild and slightly sweet. Making it the perfect fish for a bold and buttery recipe. If you’re looking to learn how to cook with this fish, or you’re an old pro interested in new styles, this grilled redfish on the half shell recipe from Chef David Bancroft is what you’re looking for.

Plus, David Bancroft is a James Beard award nominee and owner of the popular Bow & Arrow and Acre restaurants. He’s particularly adept at cooking with wild fish and game and this redfish is no different. If you’re looking for a recipe that’s sure to delight you and the whole family, this is it!

A Little About the Redfish

The redfish is an incredible fish! They’re what’s known as “estuarian fish” which means they spawn in inlets and lagoon estuaries. They’re incredibly proficient spawners and typically produce tens of millions of eggs a season. It’s one of the fastest growing fish and tend to grow to around thirty inches, though they can grow up to sixty-one.

Fun fact: they’re also called “red drum” because of the special muscles that rub against their air bladders and create a sort of drumming sound. The “drum” fish also covers the speckled trout. The difference, though, is that redfish are stronger, bigger, and tend to be longer than their trout cousins.

Grilled Redfish on the Half Shell
Pin
Print

Grilled Redfish on the Half Shell

Cuisine: American
Prep time

10

minutes
Cooking time

10

minutes

With this amazing redfish on the half shell recipe from Bancroft, you can tip the scales at your next backyard event and give everyone a taste to talk about. This delicious recipe is going to be your new go-to meal for major events—it’s easy, tasty, and not an overbearing flavor.

Crab Boil Butter Ingredients

  • 3 tbsp minced garlic

  • 1 tbsp tomato paste

  • 4 sticks unsalted butter

  • ½ cup heavy cream

  • 2 halved lemons

  • ¼ cup Worcestershire

  • 1 tsp paprika

  • 1 tsp liquid crab boil (more if you like it spicier)

  • 1 head chopped curly parsley (save some for final garnish)

  • REDFISH
  • 4 whole fillets pin bones out SCALES ON!

  • Tony Chachere’s Creole Spice

CRAB BUTTER Directions

  • Melt one stick butter in small sauce pot on medium heat. Add garlic and sweat gently and then add tomato paste. Simmer tomato paste for 1 minute. Add cream and simmer 2 minutes.
  • Add squeezed lemons to the pot. Yes, the whole lemon. Simmer for two minutes then add worcestershire and crab boil. Simmer one minute and then slowly incorporate the remaining three sticks of butter until melted.
  • Remove sauce from heat and add the parsley. Reserve for basting.
  • REDFISH DIRECTIONS
  • Fire up a charcoal grill good and hot. Season the redfish generously with Tony’s, but not packed on. Place redfish scales down directly over coals and shut lid almost all the way but leave cracked. I usually wedge a spatula or tongs to leave a one inch space for air to enter.
  • About ¾ cooked the redfish meat will begin to show tiny cracks and begin collecting pockets of juices. At this point it is time to baste with the crab boil butter. With the lid open, baste each fillet with crab butter. As the sauce melts, the butter will fall off the sides and kick up some good flames. This is good. Too much and you will know the difference. If it fires up to much, close the lid and shut the vents and choke the air to kill fire. If its just right, shut the lid all the way and let the burning butter smoke around the fish.
  • You should have the most amazing aroma of burning butter fats! 2-3 more minutes with lid closed should finish the cooking process. Open lid, baste a little more, then immediately remove fillets to large butcher block. Cut each fillet in half straight through the scales. Serve each portion with another good basting of crab butter and garnish with parsley.

More Like This:

  • Grilled Fish Recipes & Tips
  • Chef Rob McDaniel’s Pompano and Pickled Peppers
  • Pair Your Backyard Garden Vegetables with Fresh Fish

Filed Under: Outdoor Living Tagged With: cook, David Bancroft, Grilled Fish

Fall Garden Vegetable Side Dishes From David Bancroft

September 26, 2022 by David Bancroft

As growing season winds down, you’re about to find yourself with plenty of fresh, homegrown produce. Which means it’s about time to enjoy the fruits (or veggies) of your labor! And there’s no better way to enjoy your tasty work than by whipping up some delectable fall vegetable side dishes to pair with your fall cooks. David Bancroft, Exmark’s James Beard-nominated ambassador and acclaimed chef is back again with some unbeatable recipes to pair with all your favorite fall dishes. So, whether you’re looking for something light and easy or hearty and warm, Bancroft has you covered.

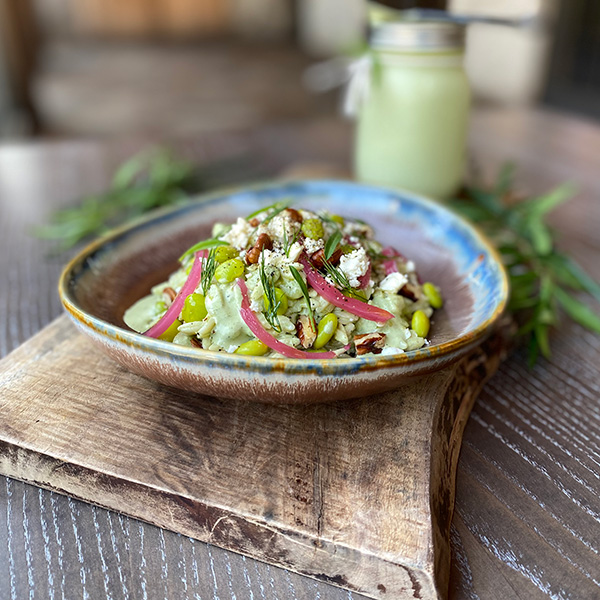
David Bancroft's Orzo Salad Fall Vegetable Side Dish
Orzo Salad
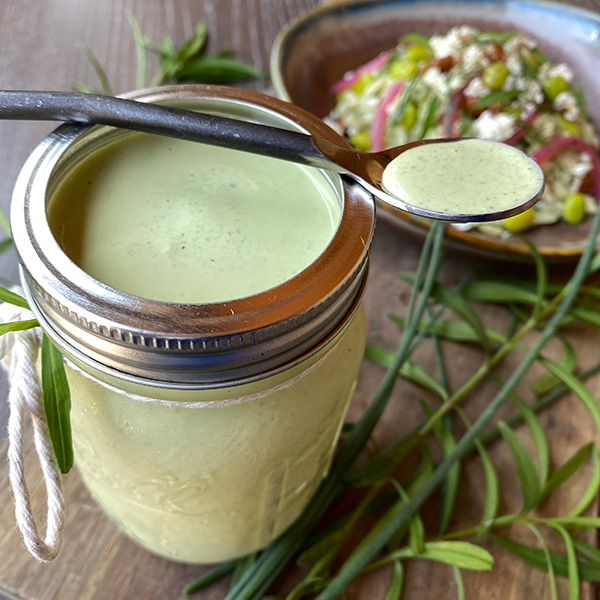
David Bancroft's Green Goddess Dressing Fall Vegetable Side Dish
Green Goddess Dressing
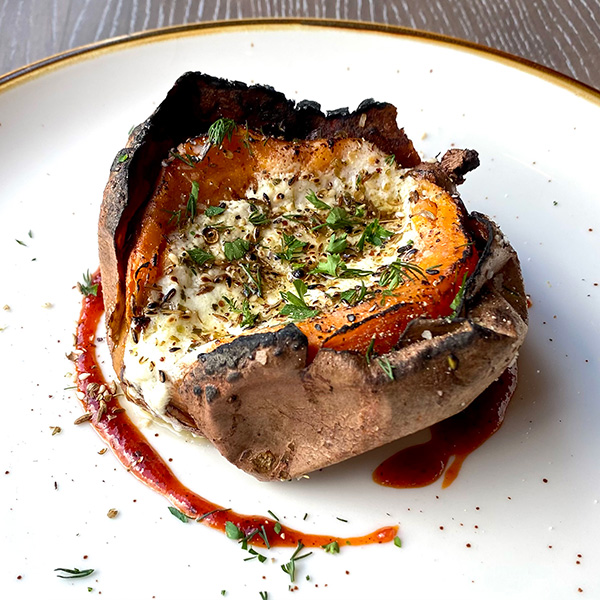
David Bancroft's Sweet Potato Fall Vegetable Side Dish
Sweet Potato

Fall Vegetable Dressings

To kick off the fall vegetable side dishes, Bancroft whips up three toppings that’ll pair great with any side (or main dish) of your choice. First, he throws together his Green Goddess dressing—a simple blend of mayo, sour cream, Greek yogurt, lemon, green onion, and plenty of herbs and spices. After blending, Bancroft says you can add any of your favorite herbs—or even more lemon—to really make it your own.

His second topping, goat cheese butter, is just as simple. All it takes is fresh goat cheese, garlic powder, and white truffle oil thrown in a blender. Then, take the salted butter and whip it with the chevre mixture until smooth. Bancroft says that you don’t have to use the white truffle oil, but it does add a perfectly complex woody and earthy flavor.

Bancroft’s final dressing keeps in line with the goat cheese trend. All it takes is mayo, buttermilk, sour cream, goat cheese, garlic, lemon, and a few herbs. Throw them all in a blender and puree until smooth for a mouthwatering condiment.

Of course, a topping isn’t any good on its own. (Although, we don’t blame you for taking a few quick taste tests here and there.) But don’t forget to throw them all in the fridge to chill first.

Fall Vegetable Side Dishes

Once you have both of your dressings, now’s the time to move on to the sides themselves! First up is Bancroft’s Butter Bean-Orzo Salad—a mix of blanched butter beans, white corn, and cooked orzo. First, simmer the beans in salted water until they’re just tender, then drain and move to a bowl. Throw in the corn and orzo, pour on the goat cheese dressing, then fold and chill. Bancroft says if you’re feeling fancy, you can top this recipe off with bacon bits, fresh basil, and extra goat cheese crumble.

After your salad’s made, grab four sweet potatoes and get to work on Bancroft’s Baked Sweet Potato side (complete with Hot Honey sauce). First, take the potatoes and rub them down with fresh rosemary, olive oil, salt, and pepper. Then toss them in the oven—unwrapped—at 350° F for about 30 minutes. And while they’re cooking, grab your favorite local honey and hot sauce and whisk them together.

Once the 30 minutes are up, remove the potatoes from the oven and set it to broil. While it preheats (again), slice the center of the potatoes and gently squeeze the ends towards the middle. This creates the perfect pocket for butter and any other toppings. Then, spoon on the goat cheese butter and broil it until the butter just begins to toast and edges start to char.

Now all there’s left to do is drizzle on your Hot Honey sauce, garnish with fresh dill and oregano, and whip up your main dish! With these terrific fall vegetable side dishes, you’re well on your way to creating the ultimate fall feast.

Fall Garden Vegetable Side Dishes from David Bancroft

Servings

4

servings
Total time

0

minutes

Ingredients

  • Butter Bean-Orzo Salad
  • 1.5 lbs Blanched butter beans

  • 4 ears White sweet corn

  • 3 cups Cooked orzo (just past al dente)

  • Fresh basil

  • Goat cheese (optional)

  • Bacon bits (optional)

  • Goat Cheese Dressing
  • 1 cup Mayo

  • .5 cup Buttermilk

  • .5 cup Sour cream

  • ¼ log Goat cheese

  • 3 cloves Garlic (minced)

  • 1 Lemon & zest

  • 10 leaves Basil

  • Salt & pepper (to taste)

  • Green Goddess Dressing
  • 1 cup Mayo

  • 1 cup Sour Cream

  • 1 cup Greek yogurt

  • 1 Lemon and zest

  • 1/2 cup Diced green onion

  • 1 oz Fresh basil

  • 1/2 oz Fresh tarragon

  • 1 oz Fresh parsley

  • 3 cloves Garlic

  • 1 tsp Fresh ground black pepper

  • 1 tsp Kosher salt

  • Goat Cheese Butter
  • 1/2 lb Salted butter, softened

  • 6 oz Fresh goat cheese

  • 1 dash Garlic Powder

  • 1/4 tsp White truffle oil (optional)

  • Hot Honey
  • 1/4 cup Local honey

  • 1 tbsp Favorite hot sauce or sriracha

  • Baked Sweet Potatoes
  • 4 Sweet potatoes (medium)

  • Fresh dill (optional)

  • Fresh oregano (optional)

  • Za’tar spice (optional)

  • Everything Bagel seasoning (optional)

Directions

  • Butter Bean-Orzo Salad with Goat Cheese Dressing
  • Simmer butter beans in salted water until just tender.
  • Drain butter beans and allow to cool to room temp.
  • Add all ingredients for dressing to blender.
  • Puree until smooth.
  • Pour dressing over butter beans, corn, and orzo.
  • Fold and chill.
  • Garnish with some fresh basil and some extra goat cheese crumbles.
  • Add some crispy bacon bits too if you’re feeling fancy!
  • Green Goddess Dressing
  • Add all the ingredients to a blender and puree until very smooth.
  • Make sure to taste for any adjustments to match your preference.
  • Feel free to other favorite herbs or more lemon.
  • Make sure to chill completely before serving.
  • Baked Sweet Potato with Whipped Goat Cheese Butter and Hot Honey
  • Rub 4 medium size sweet potatoes with chopped fresh rosemary, olive oil, salt, and pepper.
  • Bake unwrapped at 350° for about 30 minutes or until soft.
  • Allow to cool slightly for easier handling.
  • Add all goat cheese butter ingredients to mixing bowl.
  • Whip butter and chèvre mixture together until smooth.
  • Whisk together hot honey ingredients.
  • Preheat oven to broil.
  • Slice center of soft sweet potato and squeeze ends toward center gently to create a pocket for butter.
  • Spoon a generous portion of goat cheese butter into the center of each potato and place on a non-stick baking sheet or Pyrex dish.
  • Broil until butter begins to toasts and edges of sweet potato begin to char a little.
  • Remove at desired color.
  • Place potato onto dinner plate and drizzle with hot honey.
  • Garnish with fresh dill and oregano and try some za’atar spice or everything bagel spice for fun!

More Like This:

  • Pair Your Backyard Garden Vegetables with Fresh Fish
  • What to do With Excess Fall Garden Vegetables
  • Joe Thomas’s Grilled Sweet Potato Slices

Filed Under: Outdoor Living Tagged With: cook, David Bancroft, fall, garden

BBQ Tri-Tip Sandwich Recipe from Ballistic BBQ

September 16, 2022 by Greg Mrvich

There’s nothing quite as comforting as a tasty BBQ sandwich—there’s just something about the taste that immediately teleports you back to your childhood. And what’s better than your average BBQ sandwich? An elevated, tri-tip BBQ sandwich, of course! So who better to bring us a recipe for tri-tip BBQ sandwiches than Greg Mrvich, YouTube host of Ballistic BBQ.

A Brief BBQ History

In case you’re curious as to how barbecue’s become an American-loved phenomenon, here’s a bit of a breakdown.  

Barbecue first came to the United States by way of the Caribbean—where it was first introduced to locals by Spanish colonists years earlier. Once it made the jump across the sea, the Chickasaw tribe cooked up a barbecued feast that eventually moved into the more northern colonies—and all the way to Virginia. It was then that the Caribbean form of barbecue combined with British basting techniques and brought us the saucy meal we know now. 

From there, barbecue spread throughout the nation and settled into what’s now known as the “Barbecue Belt.” The Barbecue Belt has four distinct barbecue styles; Carolina, Texas, Memphis, and Kansas City. And, each region has vastly different, but equally tasty, flavor profiles and traditions. And now we’re seeing updates and elevations in the BBQ world, leading to Mrvich’s delicious tri-tip sandwich! 

BBQ Tri-Tip Sandwich with Southwestern BBQ Sauce and Pickled Onion, Hatch Chili Relish 

Servings

4

servings

Ingredients

  • 13 or 4 lbs. tri-tip roast, trimmed of all exterior fat and silver skin

  • salt

  • black pepper

  • onion powder

  • Pickled Onion, Hatch Chili Relish
  • red onion, finely chopped

  • fresh Hatch chili (or any green chili) finely chopped

  • 1 Teaspoon kosher salt

  • apple cider vinegar

  • water

  • 1 agave nectar

  • BBQ Sauce
  • 1 Cup BBQ sauce (use your favorite!)

  • 1 Tablespoon chopped chipotle peppers in adobo sauce

  • 1 Tablespoon chopped mild Hatch chili peppers

Directions

  • Pickled Onion, Hatch Chili Relish
  • Heat the vinegar mixture. In a small saucepan, stir together the vinegar, water, salt and your desired amount of sweetener. Cook over medium-high heat until the mixture reaches a simmer. (Or alternately, you can heat the mixture in the microwave.)
  • Combine in a jar. Place the thinly-sliced onions in a mason jar. Pour the hot vinegar mixture over the onions, screw on the lid, and shake the onions briefly until they are evenly coated with the vinegar mixture.
  • Let the onions marinate for 30 minutes. (You may need to press the onions down with a spoon so that they are all submerged under the vinegar mixture.)
  • Serve immediately, or refrigerate the onions in a sealed container for up to 2 weeks.
  • Tri-Tip Roast
  • Set up grill for low indirect-heat, between 225ºF and 250ºF with the cooking wood of your choice.
  • Season the tri-tip liberally on both sides and place on the indirect side of your cooker.
  • Flip your roast once it hits 90ºF.
  • Remove tri-tip from the cooker once the internal temperature hits 125ºF, loosely cover with foil and allow to rest while you get the grill ready for searing the roast.
  • Once the grill is ready, and the tri-tip has rested for at least ten minutes, sear the roast for about 1 minute per side.
  • Rest another 10 minutes, then slice across the grain.
  • Assembly
  • Toast the sandwich rolls of your choice, I used Bolillo rolls for my sandwiches.
  • Layer a nice amount of sliced twi-tip on the bottom bun, followed by sauce and then the relish.
  • Crown with the top bun and enjoy!

Alright, you’re prepped and ready to go out there and treat your guests to the best BBQ they could ask for! This BBQ tri-tip sandwich recipe is going to change your backyard party game, and you’ll be better off for it. If you’re looking to bring this recipe over the top, try pairing it with our Easy Snacks: Homemade Potato Chips.

More Like This:

  • Backyard Bacon Cheeseburger Recipe by Ballistic BBQ
  • David Bancroft’s Smoked Venison Jerky Recipe
  • Austin Dillon’s Rosemary-Garlic Steak Recipe

Filed Under: Outdoor Living Tagged With: Backyard Grilling, Ballistic BBQ, cook

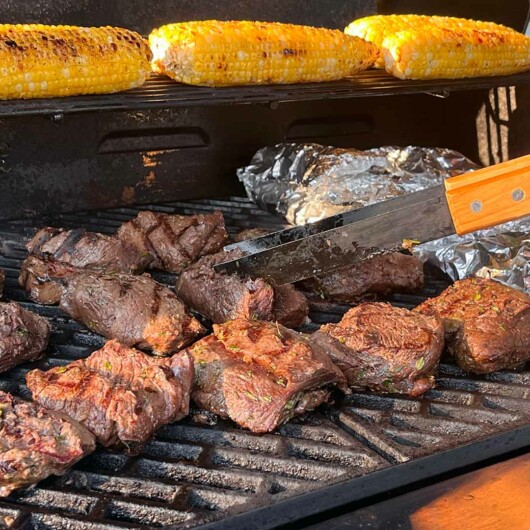
Grilled Deer Tenderloin Recipe by Joe Thomas

September 12, 2022 by Joe Thomas

Sure, deer tenderloin is great. And a recipe telling you just how to cook that grilled deer tenderloin? Even better. But what’s best? All of that and a little history about the meat, too.

Venison has long been a cornerstone of American culinary history. In fact, it’s said that the pilgrims and Native Americans shared this protein-packed meat at the first ever Thanksgiving at Plymouth. Now, deer isn’t as commonly consumed—unless you’re a hunter, that is.

If hunting game is your game, you know just how much meat a deer can yield, and you know just how delicious some of those cuts can be. But if you’re just dipping your toe into the wonderful world of venison, you might have a little to learn. So join Joe Thomas, avid bow hunter and American Archer host, as he shares his grilled deer tenderloin recipe.

Beef vs. Deer: An Easy Choice

Something folks new to the venison world might not know is just how healthy it is for you. Like beef, venison is red meat. Unlike beef, however, venison is leaner and lower in fats and cholesterol. (It’s actually lower that poultry in these categories, too!) But what it lacks in fat, it makes up for with plenty of vitamins—it’s nearly even with beef in this category. That means when you cook with venison, you’re eating the best of the best.

Grilled Deer Tenderloin Recipe by Joe Thomas
Pin
Print

Grilled Deer Tenderloin Recipe by Joe Thomas

Learn how avid bowhunter, Joe Thomas, likes to prepare his deer tenderloin on the grill. Adjust the marinade ingredient amounts to your liking—a little of this or a lot of that!

Ingredients

  • Olive Oil

  • Soy Sauce

  • Thyme

  • Rosemary

  • Minced Garlic

  • Salt

  • Black Pepper

  • Red Pepper

  • Lowry’s Season Salt

Directions

  • Marinade
  • Mix marinade ingredients
  • Place deer tenderloin in a one-gallon freezer bag
  • Toss with the marinade
  • Leave to rest in the fridge overnight
  • Deer Grilling
  • Prep your vegetables, tossing them with their seasoning
  • Heat your grill to 400 degrees
  • Cook your veggies on the grill for 10-12 minutes
  • Bring your grill heat up to 500 degrees
  • Remove your tenderloin from Ziploc bag and place straight onto your grill
  • Cook for 2-3 minutes on each side
  • Serve medium rare

Pretty simple, but delicious nonetheless. Take this delicious grilled deer tenderloin and arm yourself with a great new recipe for your next post-hunt cookout or backyard bash.

More Like This:

  • David Bancroft’s Smoked Venison Jerky Recipe
  • Daniel Arms’ Top Venison Backstrap Recipe
  • Chef Rob McDaniel’s Seared Venison and Sweet Potatoes

Filed Under: Outdoor Living Tagged With: Backyard Grilling, cook, Joe Thomas, Outdoor Pro, wild game

David Bancroft’s Jalapeño Popper Grilled Oyster Recipe

August 26, 2022 by David Bancroft

You’re either an oyster person, or you’re not. Oysters are incredibly healthy for you; they’re high in protein, low in calories, and packed with vitamins and nutrients your body needs. They’re a natural aphrodisiac. They’re the food of the stars! But no matter how much you tell someone that hates oysters, you can’t change their views. The texture can be off-putting for those that don’t understand how delicious and delicate the flavor.

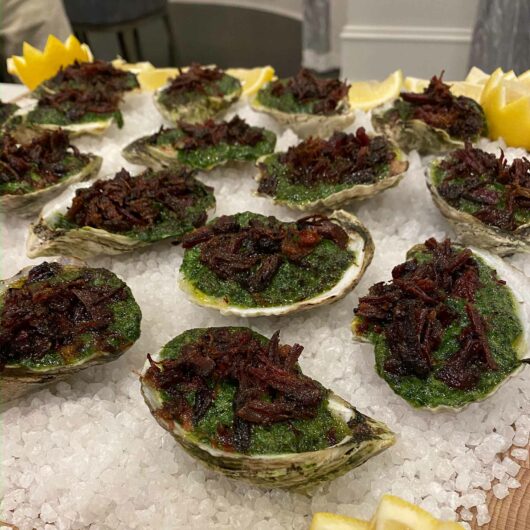
There isn’t much out there that can change an oyster-hater’s mind, except maybe this incredible jalapeño popper grilled oysters recipe from the award-winning chef, David Bancroft. His jalapeño butter mix takes an average oyster and turns up the heat and flavor to a level that could turn even the biggest hater into a true believer. Who doesn’t love the classic jalapeño popper? They’re delicious and spicy and so fun. Now, you can offer these elevated poppers to your friends and family at your next gathering. No more average poppers with this recipe!

This grilled oyster recipe requires that they first be shucked, and while we highly recommend purchasing them that way, we know it might not be possible. If that’s the case, you’ll have to do it yourself, which is no easy feat. Luckily, we’ve created a quick cheat sheet, so you know how to crack open those oysters quickly and effectively so you can get done and get into the awesome grilled oyster recipe. Check it out below.

A few tips from David:

  1. Present them beautifully on a platter filled with rock salt to help them balance for plating.
  2. Add some crispy bacon bits or brisket bits on top of each shell.
David Bancroft’s Jalapeño Popper Grilled Oyster Recipe
Pin
Print

David Bancroft’s Jalapeño Popper Grilled Oyster Recipe

Try something new to get your oysters popping!

Ingredients

  • 40-50 shucked oysters (depending on shell size)

  • 4 charred whole jalapeños (seeds optional)

  • 2 sticks softened butter

  • ½ tsp. garlic powder

  • ½ tsp. cumin

  • 1 squeezed lime & zest

  • 1 cup chopped parsley

  • 2 lbs. fresh grated pepper jack cheese

Directions

  • Tips For Shucking Oysters
  • To start with, you want to determine which side is the top and which is bottom of the oyster. The top is flat, and the bottom is slightly rounded, like a belly.
  • You’ll want to set your oyster on a dry, folded hand towel (the towel is there to protect your hand), bottom down, with the hinge, or mouth, of the oyster facing away from you.
  • Next, take your oyster knife and slowly work it into the hinge. Do this step carefully because a wrong move could result in some painful consequences. You want the blade in just enough that you can wiggle it around until you feel the jaws of the oyster pop.
  • After the hinge has opened slightly, you’ll want to turn the blade to create a little more room.
  • Finally, slide the blade around the hinge until you make contact with the muscle. When that happens, apply slightly more pressure, and sever the muscle so you can pull the top half of the oyster up and off and can go forward with this tasty grilled oyster recipe!
  • “Jalapeño Popper” Grilled Oysters
  • To start this grilled oysters recipe, char your jalapeños whole over the open fire until they’re almost entirely black. The char gives them the lovely, smoky taste you’re looking for.
  • Blend the jalapeños, parsley, softened butter, spices, and lime zest and juice in a food processor until smooth.
  • From there transfer the butter mixture into a mixing bowl and stir in the pepper jack cheese until the mixture becomes well blended.
  • Turn your charcoal grill to medium high heat (or around 400°f).
  • Lay your grilled oysters on a sheet tray and place about 1 tablespoon of the jalapeño popper butter onto each shell and grill them with the lid closed to allow the cheese to melt properly. This should take around 4 to 5 minutes.
  • With your delicious, grilled oysters plated and ready to go you can share these with your family and friends at your next great backyard event!

This pairs well with these great side dishes:

  • Joe Thomas’s Grilled Sweet Potato Slices
  • Smoked Creamed Spinach Stuffed Tomatoes
  • David Bancroft’s Fried Green Tomatoes

Filed Under: Outdoor Living Tagged With: Backyard Grilling, cook, David Bancroft, Game Day

  • « Go to Previous Page
  • Go to page 1
  • Go to page 2
  • Go to page 3
  • Go to page 4
  • Go to page 5
  • Go to page 6
  • Interim pages omitted …
  • Go to page 12
  • Go to Next Page »

Primary Sidebar

Stay Connected

Keep living your best backyard life all year round. Get alerts on the latest Original Series updates, along with the inspiration and know-how you need to enjoy backyard life to the fullest!

Loading
  • Home
  • Mowing
  • Outdoor Living
  • Lawn + Garden
  • Ambassadors
  • Originals
  • Subscribe
  • Facebook
  • x
  • Instagram
  • YouTube
  • Pinterest

Copyright © 2025 EXMARK - Backyard Life

  • Privacy Policy
  • Terms of Use
  • DMCA

Trending